Upholstery is, mercifully, not a tool-heavy craft. You can do every job in this reference with about fifteen hand tools, two power tools and a sewing machine — fewer than woodworking, metalwork or jewellery need. The Tudor upholsterer had roughly twelve tools; the modern one has those same twelve plus a stapler.
This chapter is the shopping list, organised in three budget tiers, with the opinions a little sharper than most: what to buy first, what to buy second-hand, and the half-dozen tools we now think we wasted money on. Because you’ll own so few tools, it’s worth buying ones that last a working lifetime. The premium for a good ripping chisel over a cheap one is about twenty pounds — a tenth of a single re-cover job. Spend the twenty.
The 1474 ordinances of the Worshipful Company of Upholders list the “tooles meete for the trade”: hammer, pincers, ripping iron, twine, awl, large needle, small needle, scissors, mallet, mark-stick, web-stretcher and bodkin. We still use eleven of those twelve under the same names today.
The starter kit, in three budget tiers
We organise the list by budget because it’s the honest way to buy. Tier One (about £120) is everything you absolutely need to upholster a drop-in dining seat. Tier Two (around £180 more) adds the tools for stitched-edge work, buttoning and a basic foam-and-staple sofa. Tier Three (around £500 more, plus a sewing machine) is the kit of a working professional, and includes power tools and the long needles you’ll wish you’d bought in year one.
Don’t skip ahead. There’s a tendency among new upholsterers to buy Tier Three on day one because it feels more committed — and we see it every year: the kit then sits in a box for eighteen months while the beginner works out which half of it they actually need. Build up. The progression itself is instructive.
Half the tools below can be bought second-hand — at trade fairs, on eBay, or from retiring upholsterers — at 30–50% of new prices. Rippers, web strainers, long needles and shears are the safe ones to buy used. More on how, near the end of the chapter.
Tier One — the absolute basics (£120)
Eight tools, all hand-powered, all sold new by any upholstery supplier, and all of which you’ll still be using thirty years from now. The non-negotiables: a heavy pair of 8″ tailor’s shears (paid link) with proper drop-forged blades; a 10″ regulator (paid link) for adjusting stuffing through scrim; a magnetic tack hammer (paid link) — the first thing you buy, because it picks tacks up one-handed and there is still no faster way to fix fabric; a bat-type web strainer (paid link) to tension jute webbing; a straight ripping chisel (paid link) for lifting old tacks; a hand stapler (paid link) for modern work; a staple remover with a forked tip; and a pack of twenty skewers to hold work in place before tacking.
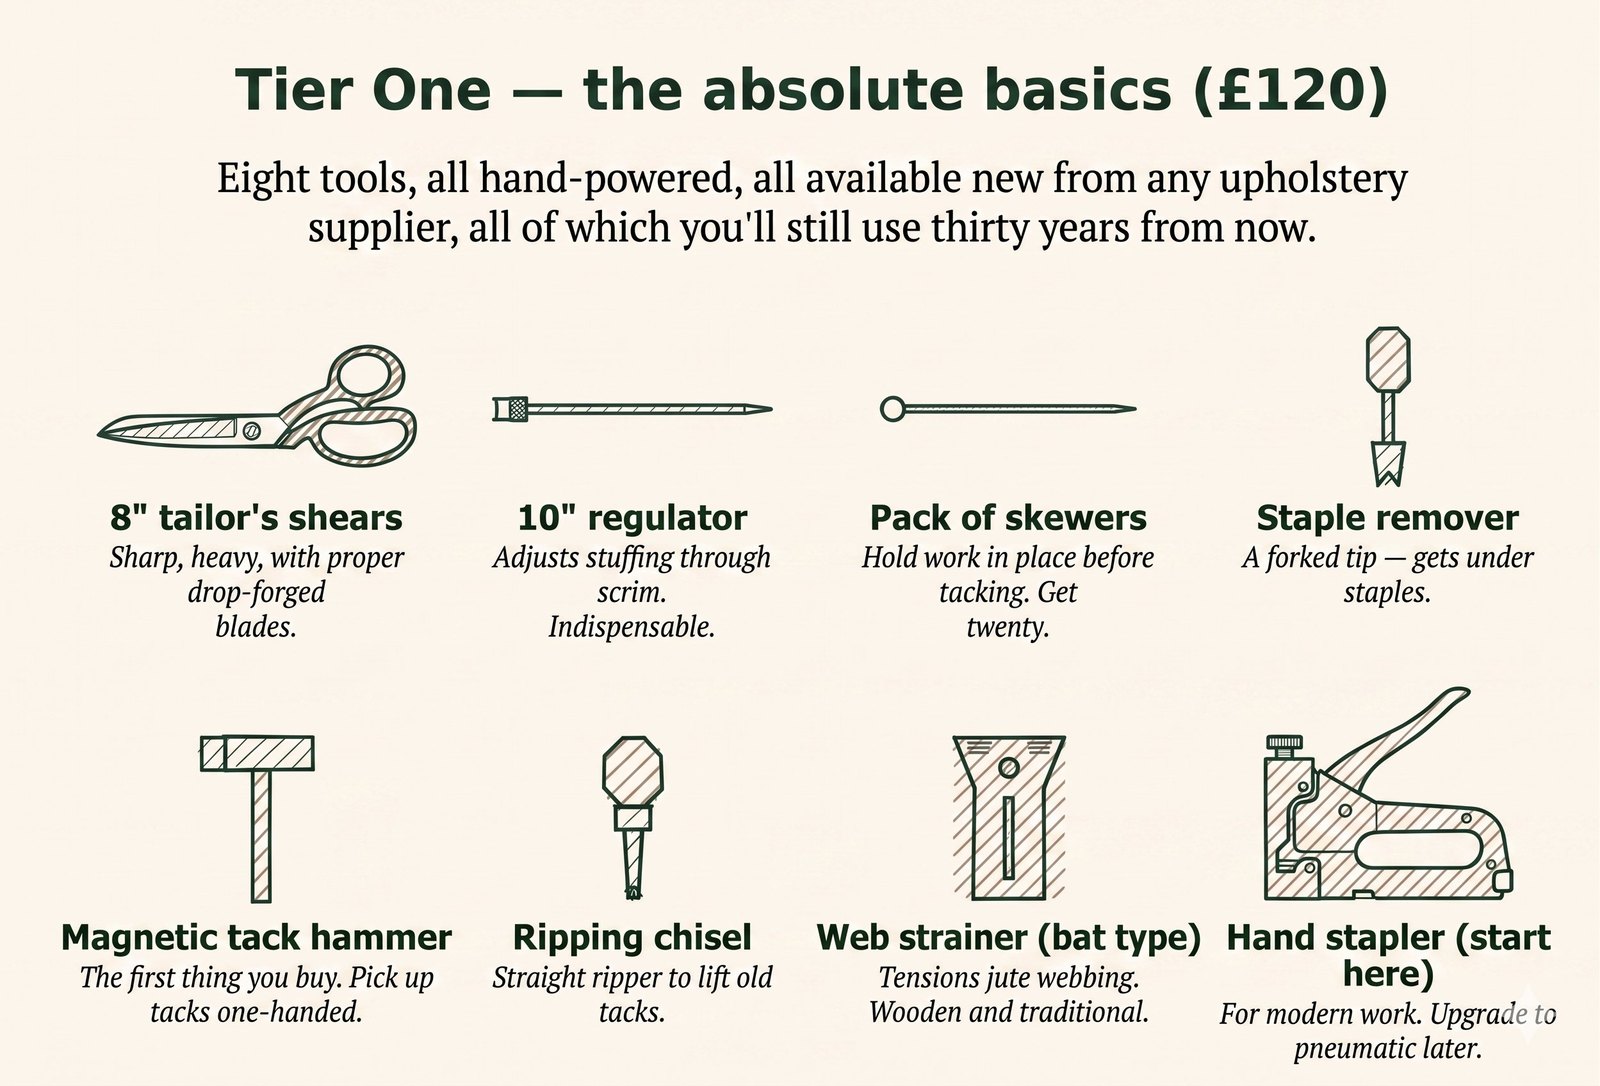
The magnetic tack hammer — a small, light hammer with one magnetised face that picks up tacks and presents them point-outwards for striking — is the single most characteristic tool of the trade. It was probably first patented in the United States around 1880, though there are earlier references to upholsterers carrying small magnets to “keep the tacks at hand”. The principle is unchanged: hold the magnetic face to the lid of an open tack box, lift, and you have a tack stuck to the head ready to drive. A skilled upholsterer can position and strike a tack in under a second with nothing but the hammer. There is no faster way to fix fabric, even now — we still use ours every working day.
Tier Two — for stitched edges and buttoning (£180 added)
These you only need once you start traditional work: stitched first-stuffing edges, buttoned backs, and pieces sprung with coil-up rather than zigzag. If the budget is tight, prioritise the regulator (you already have it from Tier One) and the curved needle — both are required for any stitched-edge work whatsoever, and both are cheap. The cranked ripper is a luxury until you start working on chairs with deep frames; once you do, it pays for itself in the first job.
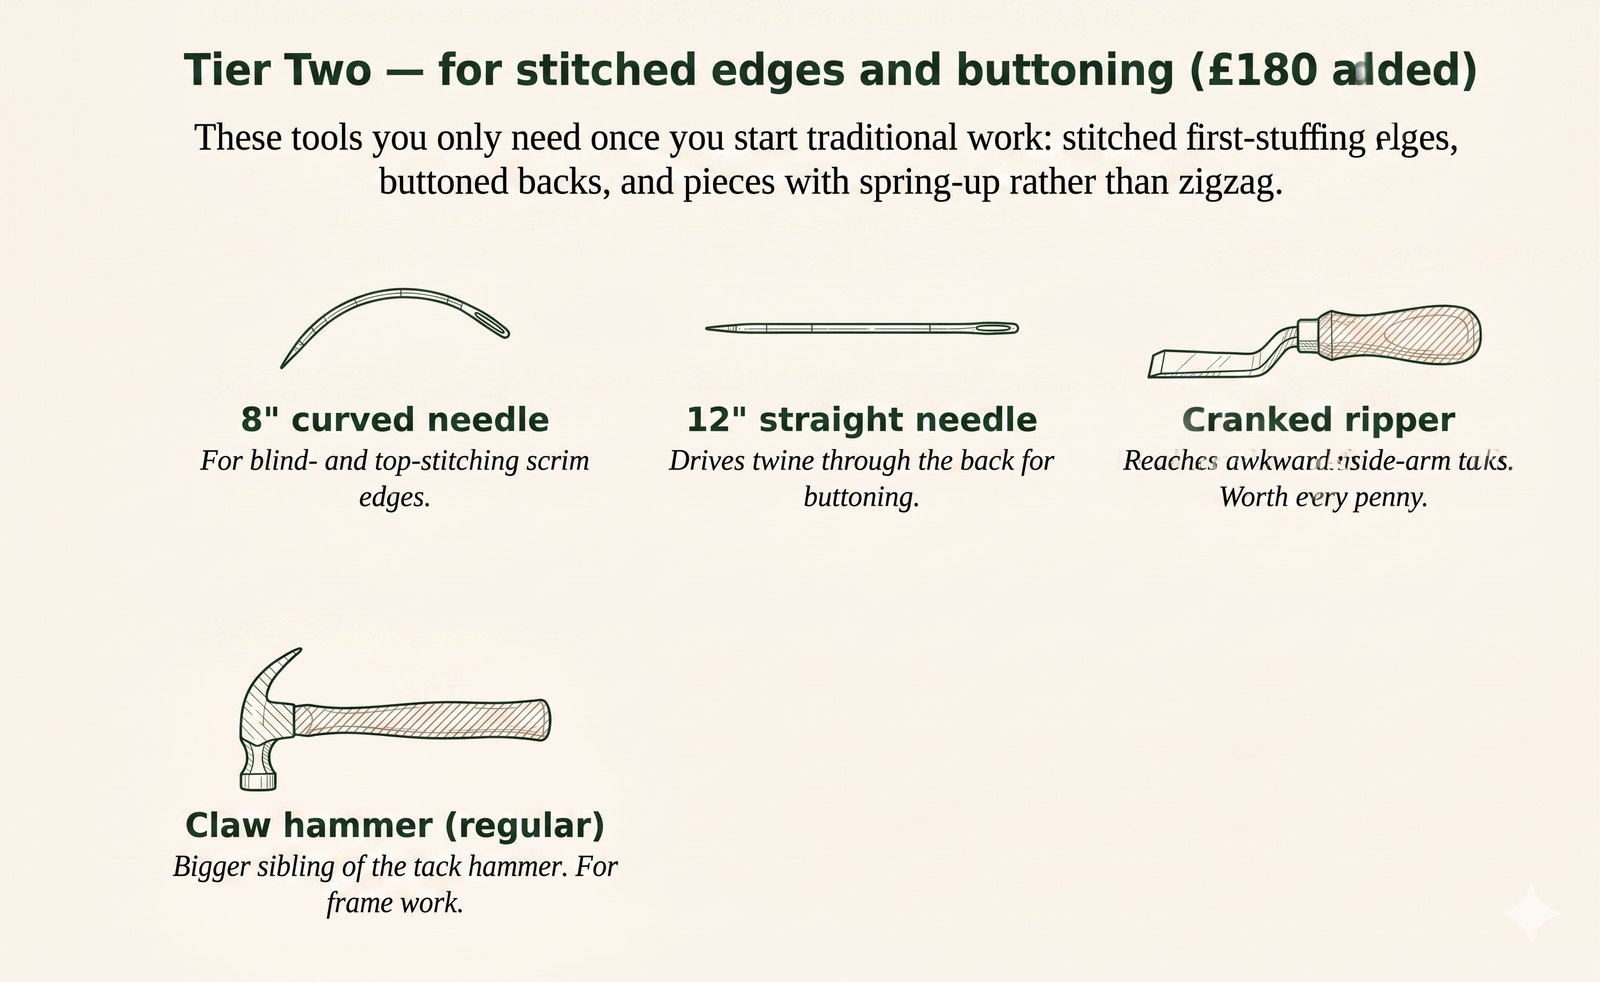
The cheapest curved needles are the ones that bend when you drive them through scrim. The slightly dearer ones from a proper trade supplier (Livedale, J. A. Milton, AJT) are made of a harder steel and last decades. The premium is about £3 a needle — pay it.
Tier Three — the working pro (£500 added, plus a machine)
At this stage you’re moving from hobbyist to commercial, and the main additions are power tools and a sewing machine.
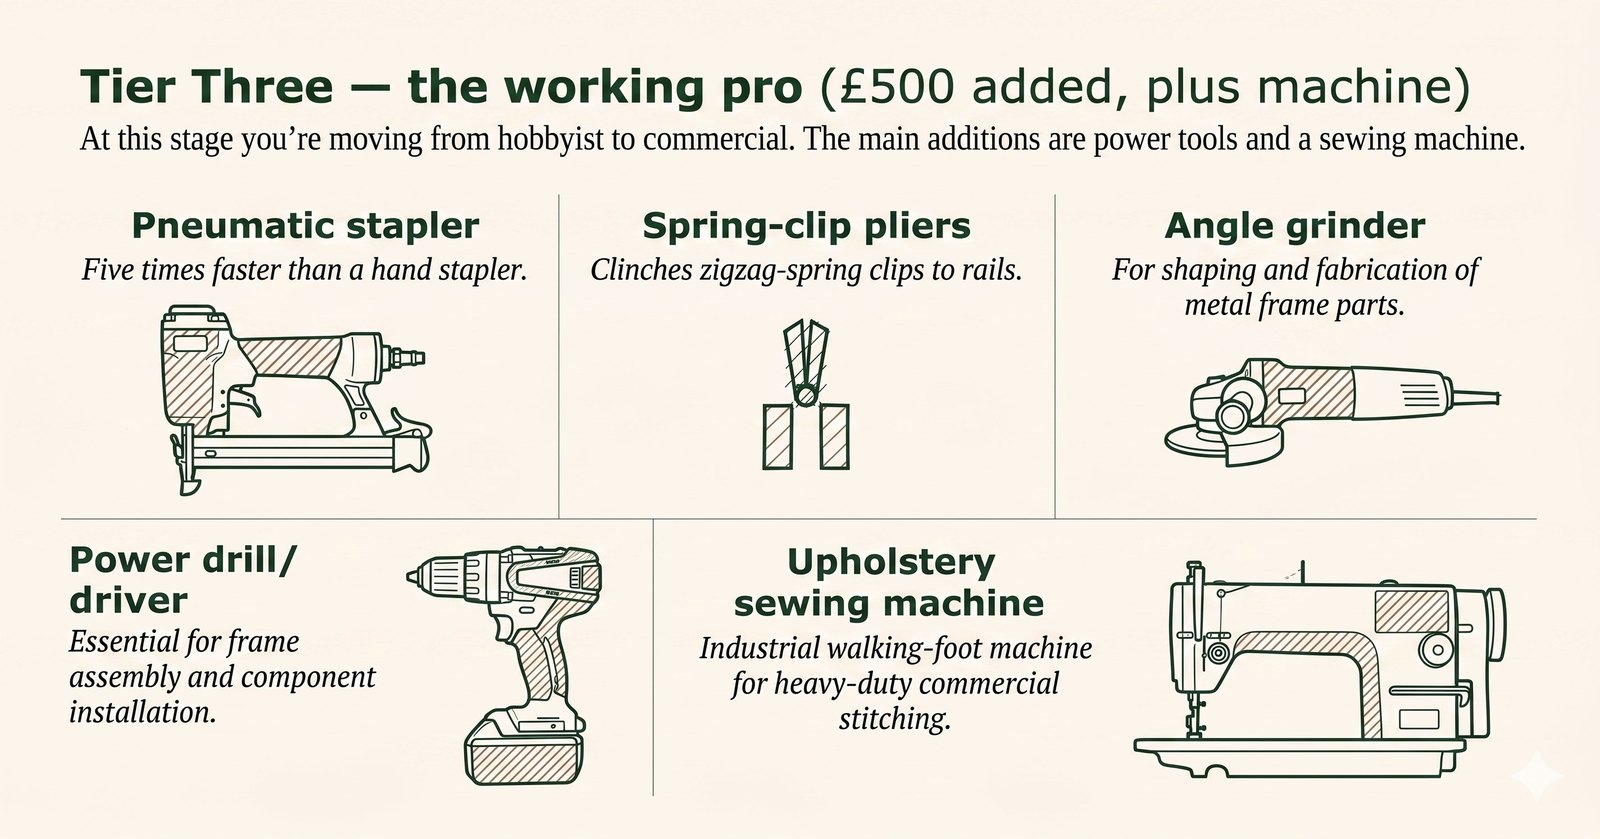
A pneumatic stapler also needs a small compressor (£120–200) and an air hose — that’s 30 dB of noise added to the workshop and a power point near the bench. The combined kit is around £350, but the productivity gain is real and shows up in every job that staples more than half a metre of fabric.
On sewing machines — this is the single most expensive purchase in the toolkit, and the one most worth getting right. Domestic machines (the kind sold in John Lewis) will not handle upholstery fabrics. You need a proper industrial machine: walking-foot, lockstitch, heavy motor and a clutch. Used Jack, Juki DNU-1541 or Brother B755 industrial machines start around £700 second-hand and will outlast you; new equivalents are £1,400 upward. We run two at Greenwood Upholstery — a Jack walking-foot that’s the workhorse for cushion covers and welt work, and a Juki that handles the heavier leather and double-thickness seams. Both have been reliable; a routine service once a year keeps them sweet.
The “walking foot” is a feeding mechanism where the upper foot moves with the lower feed dogs to grip thick layers of fabric at the same time. Without it, the top and bottom layers shift apart as you sew and the seam is ruined. For upholstery, walking foot is non-negotiable.
Buying second-hand without getting stung
About half the tools above can be bought second-hand at 30–50% of new prices. The trade-fair circuit, eBay, estate sales of retiring upholsterers, and reclamation yards are all good hunting grounds — but the risks differ in each.
Trade fairs (particularly the AMUSF Skills Fair, the Yorkshire Upholstery Show, and the Tools-and-Skills weekends run by the Heritage Crafts Association) are the safest. The tools are usually being sold by other working upholsterers, the prices are fair, and you can examine a tool before buying. The downside is waiting for the calendar.
eBay is the most variable. Everything turns up on it eventually; the trouble is that “upholstery hammer” returns half a dozen things that are not upholstery hammers, photographed badly. Buy only from sellers whose descriptions show they know the tool, ignore the “antique tool” markup, and check the postage — it often equals the tool price.
Estate sales of retiring upholsterers are the lottery ticket. You find them through AMUSF newsletters, local trade-association mailings, or simply by being known in the trade in your area. A well-loved working kit from a retiring seventy-year-old can include thousands of pounds of trade-only tools for a few hundred — but you have to be in the right place when the email goes round.
On any second-hand tool: the handle for splits, the head for cracks or rust pitting (surface rust is fine; pitting means long damp storage), and — on power tools — run them under load for at least a minute before agreeing a price.
When I was self-employed in the mid-2010s I did regular trim and cover work for a small shop in Leeds — two men in their late sixties who’d run the place since the 1980s. One morning the older of the two phoned to say they were shutting up on health grounds and wanted me to come and take whatever I could use. I drove over with a van that afternoon and came home with a complete set of trade-only stuffing regulators, a walking-foot industrial machine, two web strainers in pristine condition, a couple of kilos of vintage tacks in their original boxes, half a roll of hessian, and a small library of Frederick Palmer first editions. They charged me £200 for the lot — less than scrap value — because they wanted the kit to stay in the trade. Most of those tools are still in daily use at the workshop now. Make sure your name and number are listed where the trade can find them — the AMUSF directory is the obvious place — because this kind of call doesn’t happen if you can’t be reached.
Tools we now think we wasted money on
Honesty is more useful than enthusiasm in a toolkit chapter. Here are the tools we bought in our first decade and now regard as either unnecessary or actively unhelpful. Your mileage may vary — everyone in the trade has their own such list.
Electric (battery) staple guns. The middle ground between hand and pneumatic, and worse than either: heavy, noisy, with batteries that always need charging at the wrong moment, and a force that’s neither the gentle responsiveness of a hand tool nor the speed of a compressor. Skip it — go hand or go pneumatic.
Specialist “upholstery scissors.” A lightweight pair sold for forty pounds at a trade fair with the word “upholstery” engraved on the handle. Identical to a generic £15 pair of tailor’s shears once you ignore the marketing.
Cordless heat-cutters for foam. Marketed as the modern alternative to a serrated foam knife. In practice slow, foul-smelling, and they produce melted-foam dust that is considerably less pleasant than ordinary foam dust. A £6 serrated bread knife outperforms one on every metric.
The stuffing-rake. A little wire-tined tool sold to “tease horsehair to a uniform consistency”. Unnecessary; ten fingers do the same job faster.
Upholstery is a small enough trade that there isn’t much money in tools. The sellers who do find a market often do so by inventing new categories of tool with high margins and a marketing story attached. Approach “the new thing” with scepticism.
Buying everything at once. Build the kit in tiers; you won’t know which tools you actually use until you’ve used them.
Buying a domestic sewing machine. It cannot sew upholstery-weight cloth — the fabric jams, the needles snap, and within two weeks you’ll be back online looking at industrial machines.
Sharpening too late. Shears that “feel a bit blunt” should go to the sharpener that week. Dull shears cut uneven seams, which make uneven covers, which make unhappy customers. The sharpening costs £8.
Storing tools in toolboxes. Wall-mounted on a tool board saves ten seconds per tool, fifty times a day, six days a week. The maths makes itself.
Tier One starter kit
- 8″ tailor’s shears (drop-forged) (paid link)
- 10″ stuffing regulator (paid link)
- Magnetic tack hammer (paid link)
- Web strainer (bat type) (paid link)
- Ripping chisel (paid link)
- Hand stapler (paid link)
If you’d sooner hand the chair over than kit out a workshop, that’s our day job. Send a photo and we’ll give you an estimate. Get a quote on your piece →