This is a short chapter. Frame repair is properly the territory of the cabinet-maker, and where the work is significant we either bring one in or send the customer to one. But every working upholsterer needs to handle the small, common frame issues that turn up at strip-down: a loose tenon joint, a Swiss-cheese tacking rail, mild surface woodworm, a snapped front leg.
This chapter covers those — and, just as importantly, tells you when to call someone else. The boundary between an upholsterer’s frame work and a cabinet-maker’s territory is roughly this: if the repair is structural and visible — a snapped show-wood leg, a split arm cap, damaged carved cresting — get a cabinet-maker. If the repair is inside the upholstery envelope — a loose joint, a worn tacking rail, a chip on a rear seat rail — and won’t be seen by the customer, do it yourself. None of the repairs below need cabinet-making tools beyond what the average upholsterer already owns, with one exception: a small router for the tacking-rail repair.
If you’re not sure whether a given repair is yours to make, ask. Most local cabinet-makers will give you an honest opinion in five minutes if you bring the chair round. They’d rather you knew your own limits than produced a substandard fix with their trade’s name on it.
Re-gluing loose joints
By far the most common frame repair. A century-old chair almost always has at least one mortise-and-tenon joint that has worked loose over the decades, usually where the back stiles meet the seat rails. The repair is straightforward in principle and forgiving in practice — but there is one rule that matters above all others: do not use modern PVA wood glue on a heritage frame. Use traditional hide glue. Hide glue is reversible, so the next upholsterer in fifty years can undo what you do today, and it’s what the original frame was built with. PVA bonds the joint permanently and means the next repair will require destroying the timber to undo it.
Pre-prepared liquid hide glue (Titebond Liquid Hide, Old Brown Glue) keeps in the bottle for years and doesn’t need heating. Granular hide glue heated in a double boiler is the traditional approach and gives a slightly stronger joint — but the convenience of liquid hide is real, and its strength is more than enough for a chair joint.
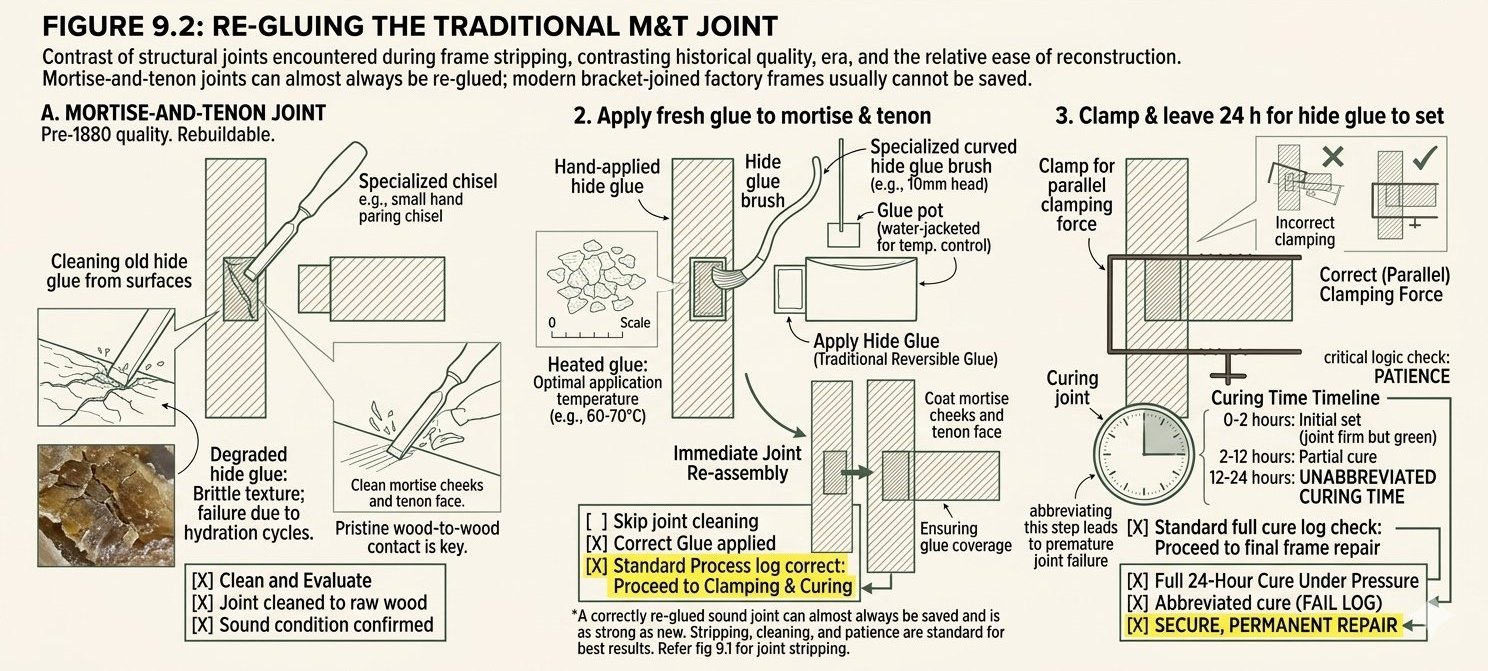
The order of work: first, work the joint apart entirely — if it’s loose enough to creak, it’s loose enough to pull apart with steady force. Second, scrape every trace of old glue out of the mortise and off the tenon with a small chisel; new glue won’t adhere to old. Third, apply a thin even coat of hide glue to both surfaces, reassemble, clamp gently with a G-clamp (or a sash clamp for longer rails), and leave for 24 hours minimum before applying any load. Hide glue is fully cured at 48 hours.
Tightening the clamp until the wood squeaks pushes all the glue out of the joint. The right pressure is just enough to bring the surfaces into contact without visible squeeze-out at the seam. If you see beads of glue forming around the joint, ease the clamp.
Splicing a worn-out tacking rail
A heavily re-covered chair eventually presents you with a tacking rail whose top edge is more hole than wood — the “Swiss-cheese” problem from Chapter 7. New tacks won’t hold; staples just push through to where the wood used to be. The fix is to rout off the damaged top strip and replace it with a fresh strip of hardwood, glued and screwed in place.
This is the one repair in this chapter that needs a tool most upholsterers don’t own. A small palm router with a 5 mm straight cutter is sufficient. Borrow rather than buy unless you do this often.
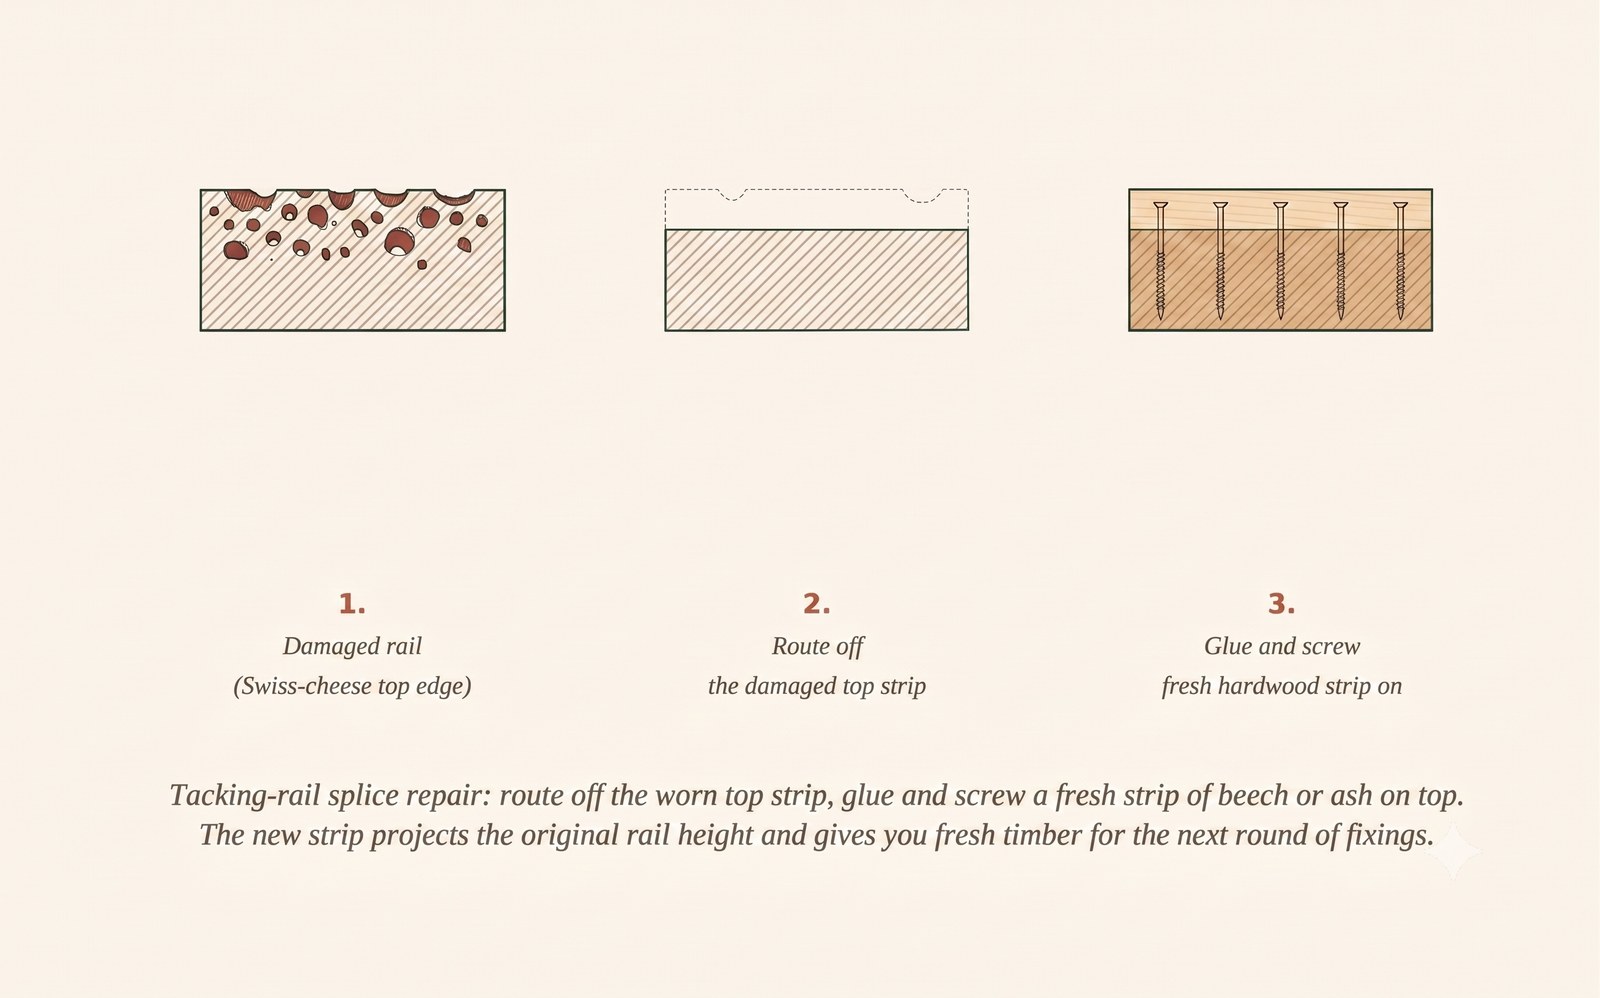
Use the same timber as the original frame — usually beech or ash. The replacement strip should be the same thickness as the routed-off material (typically 4–5 mm) and run the full length of the rail. Screw from underneath at 60 mm intervals so the screw heads don’t interfere with future tacking from above. Glue with PVA here — this is a modern repair to a working surface, and reversibility doesn’t matter. On a chair with multiple worn rails, do them all in one session: the router is set up, the screws are to hand, and the marginal cost of the second rail is half the first.
Tell the customer this work has been done. It’s not “hidden” — it’s a visible piece of new timber on the chair, and the customer is paying for it. We itemise “tacking-rail repair, two rails: 1.5 hours” on the invoice.
Treating woodworm
Live woodworm in an upholstery frame is a small problem treated promptly, a serious one ignored. The signs are small (1–2 mm) round exit holes in the timber and — if the infestation is active — fresh, pale-coloured wood dust (frass) below those holes. Old exit holes are dark and oxidised, with no fresh dust; that infestation is over and needs no treatment.
Active infestations get treated with permethrin solution (sold as “woodworm killer” in any DIY shop), applied with a brush and worked into every visible hole — two coats, 24 hours apart, on the bare frame before any upholstery starts. The frame then air-dries for a further 48 hours before re-covering, for a total turnaround delay of about a week. Heavy infestations, where the timber feels light, soft, or shows tunnelling on splitting, are beyond DIY treatment: fumigation by a specialist firm or controlled heat treatment in a chamber are the options, both commercial services that add real cost — warn the customer before committing.
Permethrin is mildly irritant; use gloves and a well-ventilated workshop while applying it. Keep treated frames away from pet bedding for the first week — permethrin is highly toxic to cats specifically.
The common British furniture-attacking woodworm is the larva of Anobium punctatum, the furniture beetle, which needs damp, soft timber to develop in — ideally softwood, sometimes beech or pine. Oak frames are almost completely immune: the tannin content of oak is toxic to the larvae, and the density of the timber makes it slow going even where they survive. If you find what look like woodworm holes in an oak frame, they’re almost always old and inactive. The exception is sap-wood — the lighter outer band on roughly-sawn oak rails, which doesn’t carry the heartwood’s tannins and can be attacked. Treat any sap-wood you can see; ignore the heartwood.
What to send to the cabinet-maker
These repairs are not in our scope. We refer them out every time, and so should you. Snapped show-wood legs: re-gluing a clean break is possible if the break is fresh, but a weathered break won’t hold, and either way the visual finish-matching is cabinet-maker territory. Missing veneer: veneer repair on Victorian or Georgian show-wood is its own discipline — we’ve never yet matched a 150-year-old veneer to a customer’s satisfaction, so we send them all out. Carved cresting damage: the carved decorative elements at the top of a chair back are properly a wood-carver’s work. French polishing: refinishing visible show-wood after any repair is a French polisher’s job. Major timber failure: if a component has split along its length, has rot, or has lost more than 30% of its cross-section to woodworm, the component needs replacing — and that’s joinery, not upholstery.
Identify a cabinet-maker before you need one. We have a long-standing arrangement with a maker in Sowerby Bridge; he turns work around in two weeks and we send each other customers. Mutual local relationships are worth far more than internet directories.
Years ago when I was self-employed, before I had a tame cabinet-maker to call on, I tried to repair a snapped Edwardian armchair leg with PVA, two screws and my best optimism. The chair held together for the customer’s first visit after collection. It came back two weeks later with a perfectly clean second snap and a customer who was, rightly, unimpressed. I replaced the leg with a turned blank from a cabinet-maker, refunded the original repair charge, and absorbed two days of lost time. The lesson cost me about £400. Find a cabinet-maker; pay them; pass the work on; sleep at night.
PVA on a hide-glue joint. PVA is irreversible and incompatible with the original. Use hide glue on heritage joints.
Skipping the joint clean-out. New glue will not bond to old residue. Five minutes of chisel work; non-negotiable.
Tightening the clamp until it squeaks. Pushes the glue out of the joint. Use just enough pressure to close the seam.
Treating woodworm on a frame still warm from stripping. Stuffing dust traps permethrin and creates a hazardous surface for the next person. Strip fully, vacuum the frame, then treat.
Promising a frame repair you can’t deliver. If it might be a cabinet-maker’s job, say so before quoting the upholstery.
Frame-repair kit
- Liquid hide glue (reversible) (paid link)
- G-clamps / sash clamps (paid link)
- Woodworm killer (permethrin) (paid link)
- Palm router (for re-railing) (paid link)
Loose joints, a wobbly frame, a chair you’re not sure is sound? We assess and repair frames as part of every re-cover. Send a photo for an estimate. Get a quote on your piece →