Stripping is the first thing you do to any old chair, and the single most informative half-day in upholstery. Every layer you lift off tells you something about the chair’s life: how it was made, how it’s been re-covered, where it’s been used, what’s wrong with it, and what’s worth keeping.
Apprentices who don’t treat stripping as detective work end up doing the same job twice. Apprentices who do, learn faster than by any other route into the trade. This chapter walks you through stripping a typical sprung armchair — the order the layers come off, what to look for in each one, what to keep and what to throw, and the moment-of-truth question of whether the frame underneath is worth re-using or whether the whole project is a money-pit.
For a strip-down: a ripping chisel and cranked ripper (Chapter 4), a tack hammer for prising, a staple remover, an FFP3 dust mask, an open-topped bin or scrap bag, labelled ziplock bags for any saved fittings, and at least two hours of unhurried time. Don’t rush stripping — you cannot undo what you damage.
The order: outside-in, the reverse of construction
Where building a chair is inside-out, stripping is outside-in: you take off the layers in the reverse order they went on. Top fabric first, then calico, then top stuffing and felt, then scrim and first stuffing, then hessian, then springs, then webbing — leaving the bare frame. Each stage is its own decision moment: keep, replace, or restore.
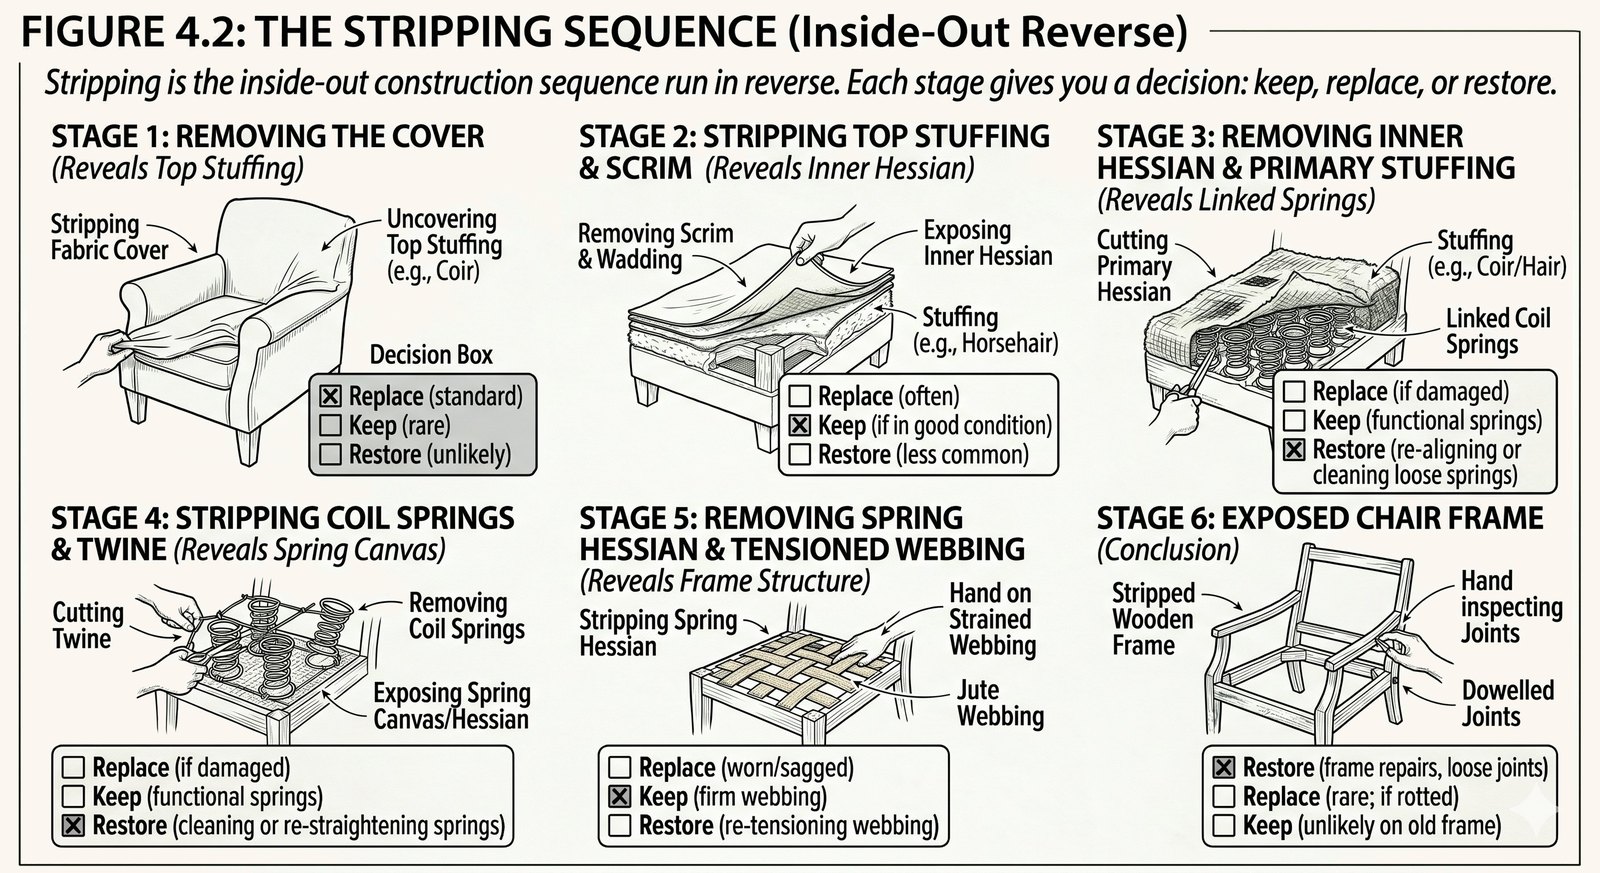
There’s a temptation, especially after the first hour, to rip layers off as fast as possible to “get to the frame”. Resist it. Each layer carries information about what to do when re-building — a single ripped scrim can hide stitched-edge geometry you’ll wish you’d studied.
Reading the old work
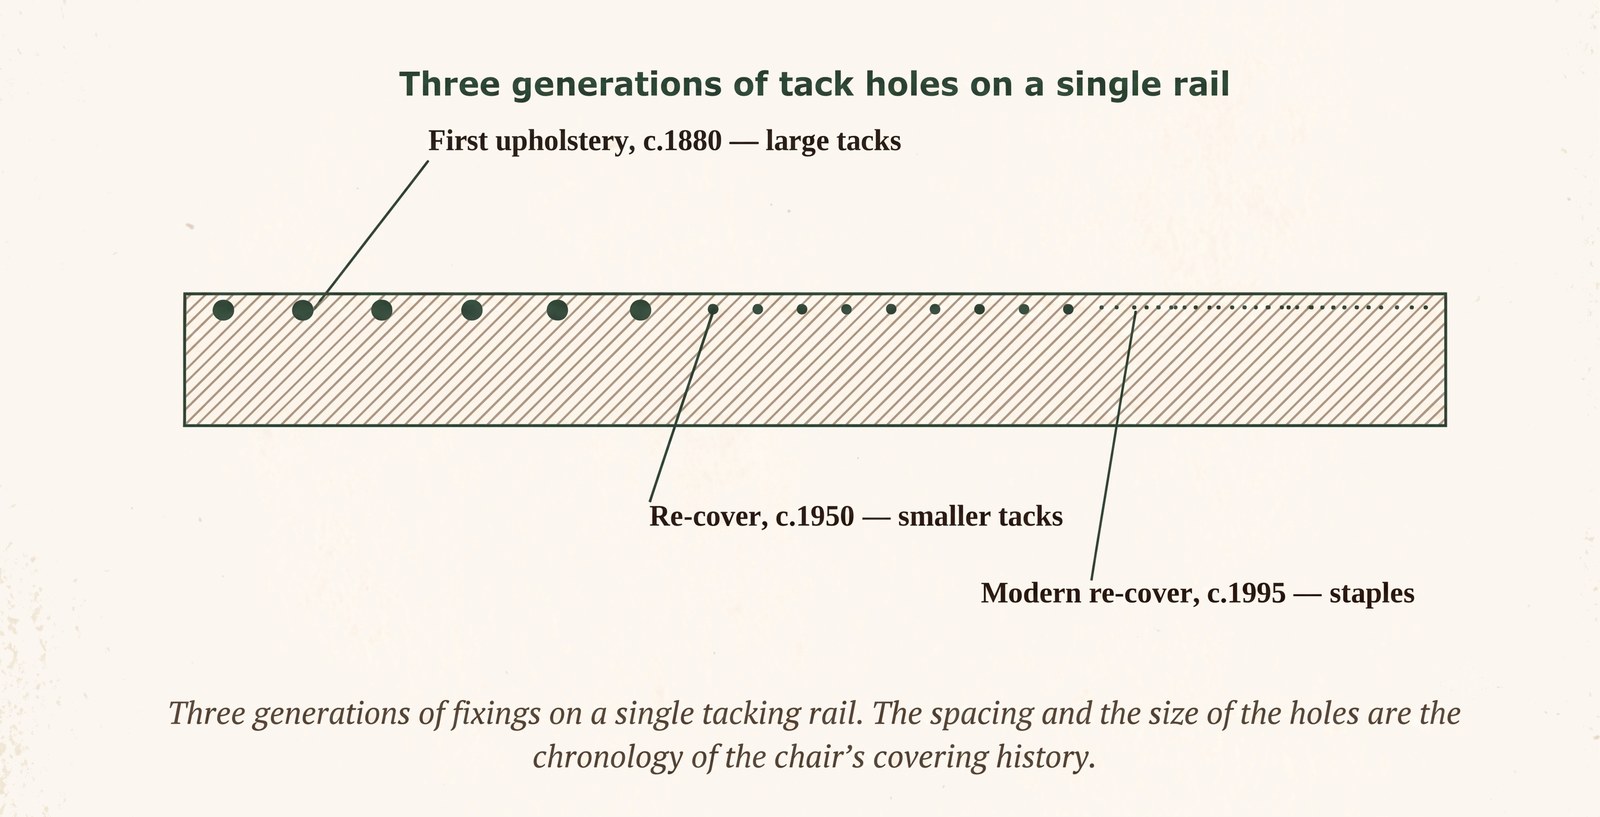
Most chairs older than thirty years have been re-covered more than once. Each re-cover leaves traces — tack holes, staple-track marks, faint outlines of older fabric patterns — on the timber underneath. Reading those traces tells you a lot about what the chair has been through and, importantly, how many more re-covers the frame can take before the timber gives out.
The key thing you’re looking at is the top edge of the tacking rails. If it’s a continuous line of unbroken timber, the chair has had one cover. If it has a band of small holes, the chair has had two or three. If it’s a “Swiss-cheese” band 30 mm wide of overlapping tack and staple holes, you’re looking at a fifth or sixth re-cover, and the timber underneath cannot reliably hold another tack.
We’ve worked on chairs re-covered eight or more times, where the visible timber on the rail edge is more hole than wood. You can sometimes save such a frame by routing off the damaged top edge and replacing it with a fresh strip of timber — but it’s a substantial frame repair (Chapter 8), and the customer needs to know about it before you start.
A customer brought us a Howard & Sons armchair from a house clearance, with a slumped seat and stained 1970s Sanderson upholstery. Stripping it took us through four layers of history in fifty minutes. Top: a 1972 invoice tucked behind the dust cover, from a Manchester upholsterer — £48 for the re-cover. Underneath: the original Howard hessian dust cover, intact, with the maker’s stamp and the date 1903 stencilled in black ink. Under that: horsehair stuffing in mint condition, which we re-used. Under that again: the original spring-up by Pratt’s pattern, knots intact, the springs still bouncy, on a solid beech frame with its original tenoned joints in working order. We did a first-stuffing reset, replaced the calico, used the 1903 horsehair as the second stuffing, and top-covered in the customer’s wool blend. The chair will outlive its new owners — and we got a half-day’s stripping pleasure none of us has stopped talking about.
What to save, what to bin, what to label
Save: all clean horsehair, coir or palm-fibre stuffing (it can almost always be re-teased and re-used — see Chapter 5); all laid-cord spring lashings if intact (they show you the original tying pattern when you put new springs in); the original calico under-cover if you can lift it whole, because it’s a perfect template for the new one; any maker’s labels, stamps or dust-cover invoices for the customer’s interest; and the bottoming cloth if it’s in reasonable condition.
Bin: all show fabric (you can’t re-use it); old felt and cotton wadding (almost certainly compressed flat and full of dust); old polyester wadding that has lost its loft; any springs that are visibly rusted, broken or asymmetrically compressed; and all old hessian and scrim — even if it looks fine, jute weakens with time and new hessian costs almost nothing.
Label: any decorative trims, brass nails, castors or hardware you remove. Pop them in a labelled ziplock — you’d be amazed how often these go missing between strip-down and finish, and original Victorian brass cup castors are not cheap to replace.
We use thick black marker on cardboard labels, tied to the frame with twine: customer name, project reference, date stripped. It’s genuinely surprising how many workshops have one chair with a sad “whose is this?” tag on it.
Is the frame worth saving?
This is the question the customer most wants answered, and the one that decides whether the project is viable at all. With the bare frame in front of you, three things settle it: the joints, the tacking rails, and the show-wood.
Joints. Test by pushing and pulling on the back, the arms and the seat rails in turn. A solid frame doesn’t creak, flex or squeak. Any movement at the joints means a frame repair is needed before upholstery starts, and the kind of repair depends on the joint type.
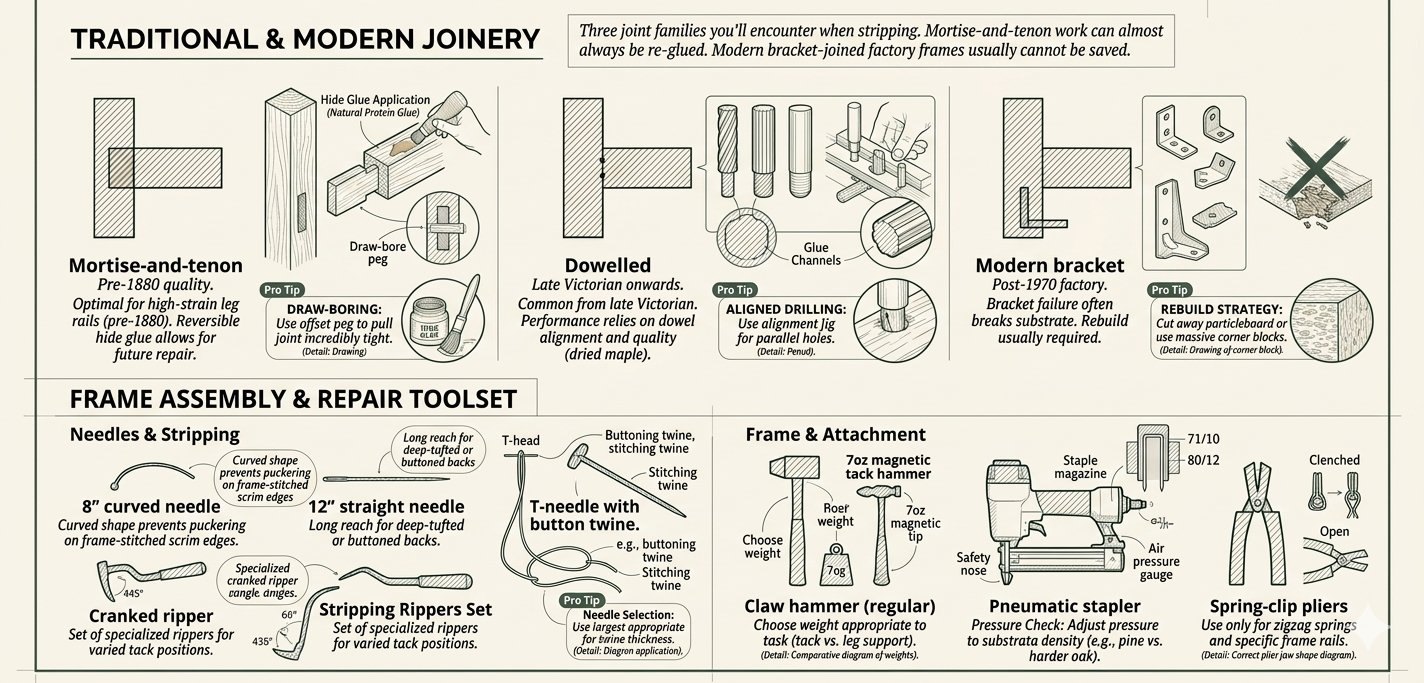
Stand behind the chair, grab the top of the back with both hands, and push it forward with about 20 kg of force. A good frame moves perhaps 5 mm and returns. A bad one creaks and leaves the back leaning forward.
Tacking rails. Examine the top edges of every rail the upholstery attaches to. Light tack damage is fine; Swiss-cheese damage means you need a re-railing repair before re-covering. Show-wood. Visible legs, exposed arms, carved cresting — check for splits, missing veneer, woodworm and broken castors or castor sockets. Show-wood repairs are a different specialism and may need a French polisher; if the show-wood needs significant work, the project is no longer just an upholstery job. When all three areas come back clean, the frame is worth saving and you can quote with confidence. When any one of them needs major work, factor it in — or factor it out by declining the job, which is sometimes the right answer.
Live woodworm shows up as fresh, pale-coloured wood dust (“frass”) below the holes. Old, dead infestation has dark, oxidised holes and no fresh dust. Treat live infestations with permethrin solution before any other work — otherwise the new upholstery becomes the worm’s new home.
If you ever strip a chair and find a stamped marking inside the frame reading HOWARD & SONS, BERNERS ST, stop work and call the customer. Howard’s, founded in London in 1820, made the Rolls-Royce of Victorian and Edwardian armchairs; surviving Howard frames are valuable in their own right and warrant heritage-grade reupholstery rather than anything else. There are perhaps a dozen named Victorian makers whose stamps transform a re-cover quote — Howard, Hindley, Holland & Sons, Gillows, Maple, and Heal & Son among them. When you find one, tell the customer; the conversation about how to treat that chair is a different conversation.
Ripping with the grain instead of across it. A ripping chisel works by levering tacks up, blade aimed across the grain. Working with the grain splinters the timber under every tack head.
Stripping over carpet. Tacks go everywhere and turn up in feet later. Strip on a hard floor with a sheet down — ideally one you can roll up and shake into the bin.
Throwing the original cover before measuring it. Even if you can’t re-use it, the old cover gives you the panel shapes for the new one. Measure first, photograph the pieces in place, then bin.
Working without a mask. Decades of dust live in old stuffing. We’ve seen new starters develop hand-sized rashes from horsehair allergens. FFP3 mask, every time.
Strip-down kit
- Ripping chisel (paid link)
- Staple remover / lifter (paid link)
- Magnetic tack hammer (paid link)
- FFP3 dust masks (paid link)
Not sure if your chair is worth saving? That’s the exact question we answer every week. Send a photo and we’ll tell you straight. Get a quote on your piece →