This is the most important chapter in Part Two — and the hardest. Take it slowly.
Everything before it — webbing, springing — is the foundation; everything after — calico, top cover — is the finish. The stitched-edge first-stuffing pad sits between, doing the structural shaping that gives a traditional chair its character. It is the longest single technique in the trade, the one that takes an apprentice the most months to learn well, and the one that most reliably distinguishes a hand-built chair from a factory one.
Read Chapter 5 on horsehair before working through this chapter. The quality of the stuffing material matters more here than anywhere else in the chair: coir is acceptable, palm is acceptable, polyester is not — and old horsehair stripped from another chair is often best of all.
What we're building is a structural pad of horsehair that sits on top of the springs, holds the seat shape, and carries the load through the pad's stitched rim. The rim is the thing. Without it, the pad is just loose stuffing, compressing where you sit and spreading flat over the years. With it, the pad has a defined edge that pushes back against the sitter and doesn't deform. The technique comes in five stages, each with its own section below: bridle ties, first stuffing, scrim cover, blind stitch, and top stitch.
The build sequence at a glance
Before the section-by-section detail, here is the whole first-stuffing build, stage by stage — from the bare webbed frame to the finished, stitched rim under its top cover.
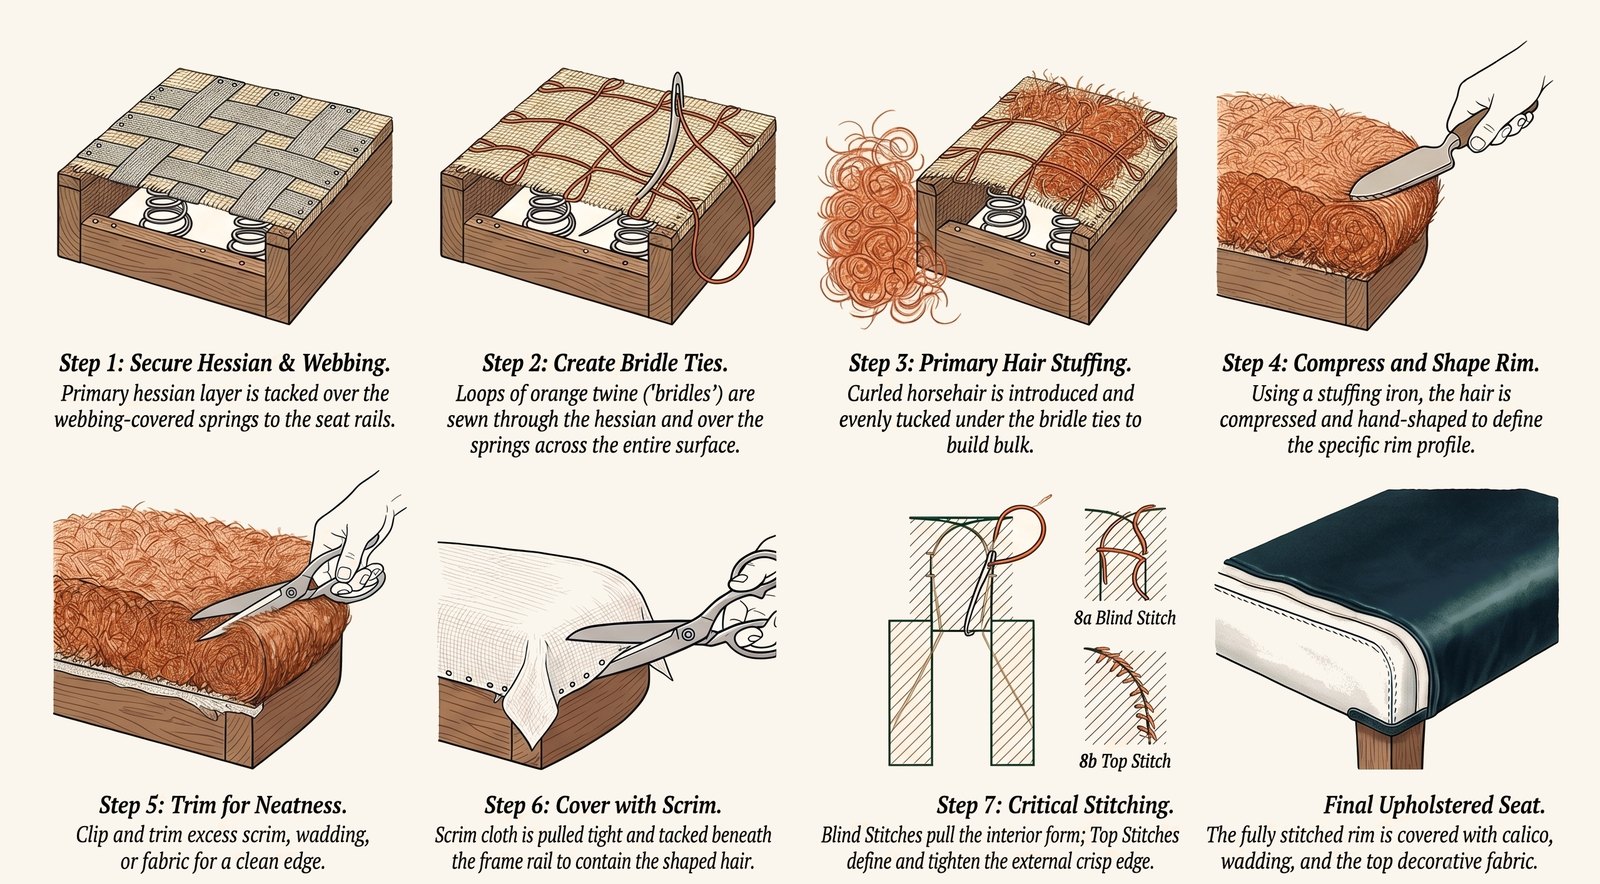
Stage 1: bridle ties
Bridle ties are the first thing to go on top of the hessian. They're loose loops of waxed mattress twine (paid link), sewn into the hessian in a pattern that looks like a lattice from above — rows about 100 mm apart, each offset from the next. The loops sit slightly raised, ready to have horsehair tucked under them.
Use a long curved needle (paid link). The stitches passing through the hessian are short — about 20 mm — while the loops between them are longer, about 60 mm, and sit raised perhaps 25 mm above the surface. Don't tighten the bridles down to the hessian; you need the slack so the horsehair can be pushed through. Without bridles, loose horsehair shifts in service; with them, it stays where you put it. They're cheap insurance against the “dead spot” that appears in chairs where the bridles were skipped.
Bridling feels slow on the first chair and fast on the tenth. With practice the rate drops to around ninety seconds per loop; on a first chair, allow five minutes per loop and don't worry about it.
Stage 2: the first stuffing
Now the horsehair (paid link) goes on. Tease it apart with your fingers into wisps roughly the size of a tennis ball; the more evenly you tease it now, the easier the rim will be to shape later. Lumpy horsehair makes a lumpy seat — keep teasing until every wisp is uniform.
Tuck wisps under each bridle loop, working from the centre of the seat outwards. The horsehair builds up under the loops, gradually filling the whole seat area to a rough depth of 80–100 mm. Don't worry about precise shape yet; the next stage handles that — just get the volume in. Allow about 2 kg for an armchair seat. New horsehair is ferociously expensive, so if you have re-usable hair stripped from an old chair, this is exactly where to use it: old horsehair is often better-curled than new and gives a more responsive pad.
An armchair seat takes roughly 2 kg of horsehair for the first stuffing and 1 kg for the second; a two-seater sofa about 4 kg plus 2 kg; a three-seater 6 kg plus 3 kg. These are guides only — the right amount is the amount that makes the right shape, not what the table says.
Stage 3: pack, shape, build the rim
Now the work that's particular to stuffed-edge upholstery. The horsehair gets pushed and packed into a shape with a sharper edge than a loose pile of stuffing has. The rim is the thing: a defined, square-ish edge along the front and sides of the seat, where the show fabric will eventually form a sharp visual line.
Push the stuffing toward the rails with the heels of your hands. Build a slight dome in the centre of the seat. Add more horsehair where there are dips; take handfuls away where there are mounds. The pad should end up uniformly domed, with a roughly square edge where it meets the rails on the front and sides. There's no shortcut here — the better the shape at this stage, the easier the next two will be. Spend twenty minutes getting the pad right and your stitched rim will be twice as fast.
If you stripped this chair (Chapter 7), the photos you took of the original pad are now your reference for what shape to build. The original maker spent the same twenty minutes shaping it; you're working back to where they started.
Stage 4: the scrim cover
Scrim is the light hessian (paid link) that goes over the first-stuffing pad to contain it before stitching. Cut a piece big enough to drape over the whole pad with 100 mm of overhang on every side. Drape it on, smooth it down with the heel of your hand, pull each side down to the rail and tack temporarily with skewers.
Now the patient work: pull each side gradually tighter, moving front to back to side to side, working the scrim down so the stuffing is firmly contained but not compressed. The scrim should fit the pad like a second skin. Tack permanently with 10 mm tacks every 25 mm along each rail. Don't worry about the corners yet — they get pleated last. Once the scrim is on, the pad shape is fixed for the rest of the chair's life. Get it right.
Most upholsterers find it almost impossible to get the scrim tension right working alone on a big pad. Get a second pair of hands and have them hold the opposite side while you tack. We help each other on every wing-back scrim cover.
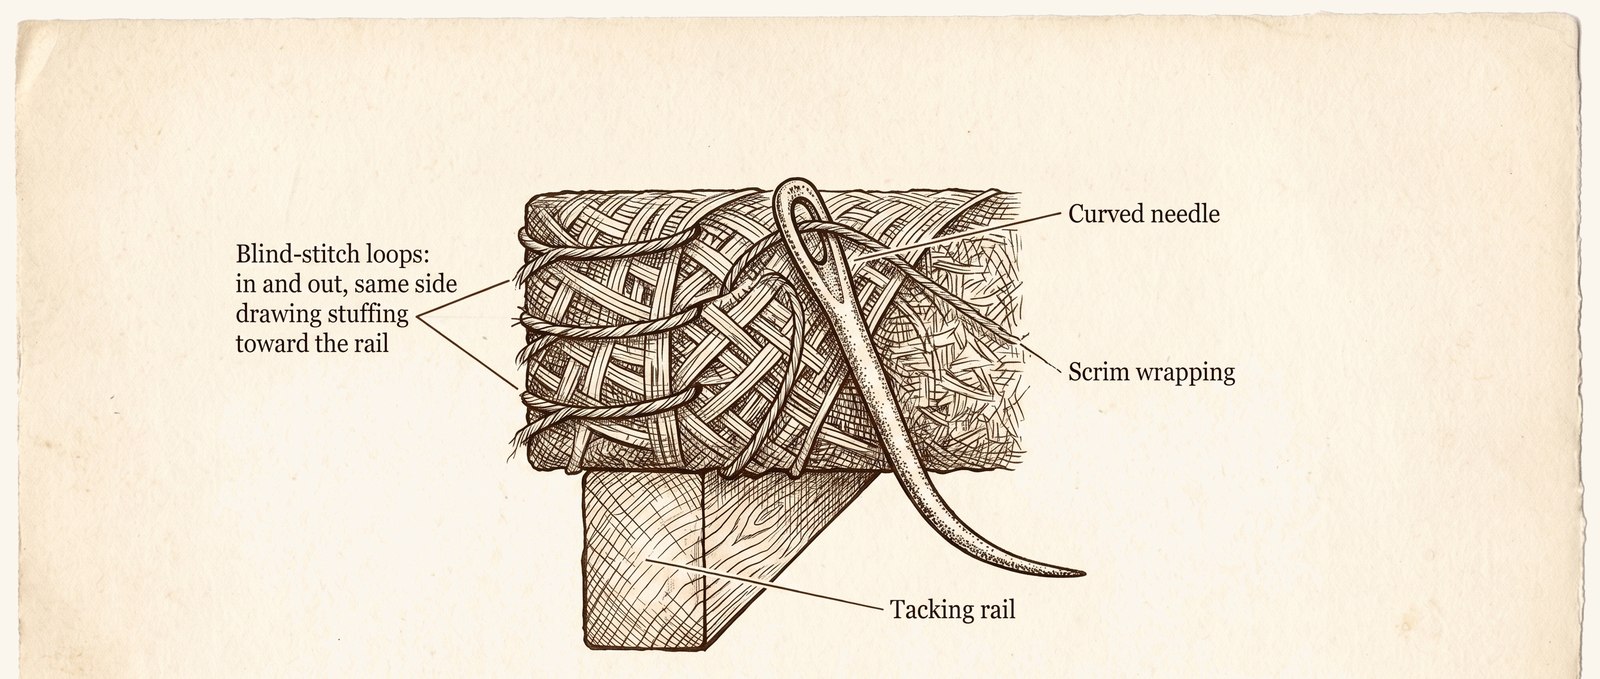
Stage 5a: the blind stitch
The blind stitch is the structural genius of stuffed-edge upholstery. With the scrim now containing the pad, take a long curved needle and waxed twine and stitch a series of horizontal loops along the side of the pad — needle in low on the side face, out a couple of centimetres higher up the same side face, without going all the way through to the top.
When you tighten each loop, it draws horsehair from inside the pad outward toward the rail, building up a firm rim. Three rows of blind stitches up the side of the pad, stacked vertically, give the rim its full structural depth. The stitches are called “blind” because they don't appear on the visible surface of the pad — they hide on the side.
If the stitches showed on the top surface of the pad, the show fabric over them would dimple where each stitch is. Blind stitches keep the top smooth.
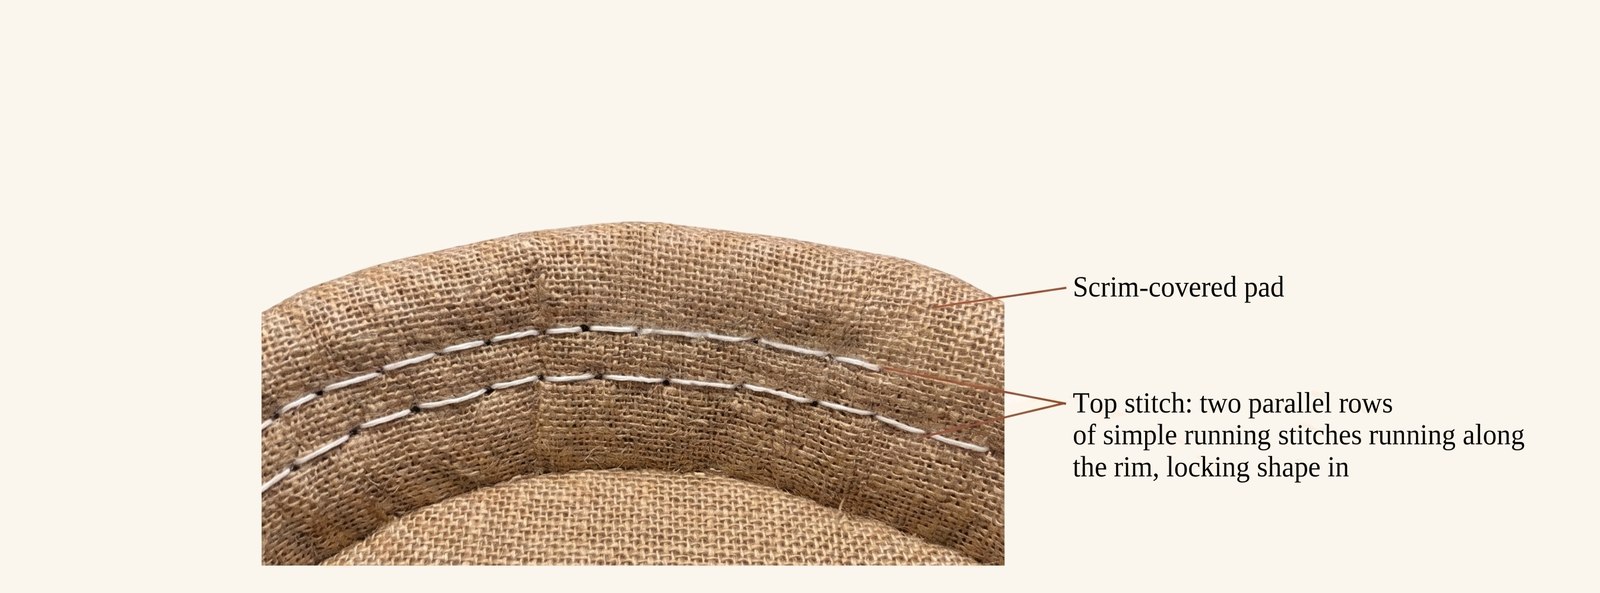
Stage 5b: the top stitch
After the blind stitches build the rim height, the top stitch locks the rim shape in. Same long curved needle, same waxed twine, but now the stitch does go all the way through the pad — needle in on the side face, out on the top face about 25 mm in from the edge, then back down through the side face 12 mm further along the rim. A continuous chain along the whole rim length.
Top stitches show on the top of the pad as a line of regular stitches running parallel to the rim. They'll be hidden by the calico and top fabric later, so don't worry about exact regularity — just keep them consistent enough that the rim shape they form is even. After the top stitch, you can run your finger along the rim and feel the firm, sharp edge that defines a stitched-edge seat. That edge is what your customer is really paying for; it's what no foam pad can replicate; it's why the chair will still feel right in 2070.
Different traditions tie the top stitch slightly differently — the French tradition uses a finer “mousseline” twine, the English uses standard mattress twine. The result is the same; the small material differences don't matter much in service.
After the rim: the second stuffing
With the stitched rim formed, the seat has its structural shape. What it needs now is softening — a layer of softer stuffing (often a lighter horsehair, sometimes wool, sometimes hog hair) on top of the scrim, providing the “feel” the sitter notices.
The second stuffing is much thinner than the first — perhaps 20–30 mm uncompressed — and goes on loose, not bridled. It's contained by the calico cover (Chapter 14) rather than by scrim and stitches. Its job is comfort, not structure; it adds give where the first stuffing is firm. Above it, a layer of cotton felt or wadding smooths the surface. Then calico. Then top fabric. We're at the threshold of Chapter 14.
The single most common shortcut in modern reupholstery is to skip the second stuffing — calico straight onto the first-stuffing scrim. The result is a chair that feels hard to the touch and gets uncomfortable after twenty minutes' sitting. Don't skip it.
Tools & materials for this job
- Curled horsehair (or coir / palm) stuffing (paid link)
- Hessian and scrim (paid link)
- Waxed mattress twine (paid link)
- Long double-ended & curved needles (paid link)
- Upholstery regulator (paid link)
- Upholstery skewers (paid link)
- 10 mm tacks (paid link)
- Cotton felt or wadding (paid link)
I learned the stitched edge from Bryan Mitchell at Vale, in the second week of my apprenticeship. The exercise was to stitch one rim of a small footstool — about 60 cm of edge — while Bryan watched. The first attempt took three hours and came out lumpy enough that he had me undo it and start again. The second took two hours and was acceptable. Bryan said: “Now do nine more.”
By the end of the week I'd stitched ten rims and my average was down to forty-five minutes for the same length of edge. By month two I could stitch a full armchair rim in a morning. There is no faster way to learn this than by doing it — expect to be slow at first; the speed comes.
The blind stitch as we know it appears in upholstery records from the late 17th century — first in French royal workshops, then quickly across the channel to England with Huguenot upholsterers fleeing the revocation of the Edict of Nantes in 1685. Before it, padded seats had loose stuffing under a top-only cover; they spread and flattened in service.
The blind stitch was the technique that made the “easy chair” possible — a padded seat with a defined shape that lasted. The first records of British easy chairs appear within twenty years of the technique arriving. The seat shape we still build today, three centuries later, is a direct descendant of that 1685 innovation.
- Lumpy first stuffing. If the horsehair isn't evenly teased before going on, the pad has thin and thick spots and the stitched rim follows the lumps. Twenty minutes of teasing saves an hour of evening the pad later.
- Loose scrim. Scrim that isn't pulled tight enough lets the horsehair bulge between the stitches when you tighten them, and the rim never forms properly. Pull tighter than you think you need to.
- Going through the top with the blind stitch. The blind stitch must not exit on the top face; if it does, the show fabric will dimple over each stitch. Keep the needle horizontal in the side face.
- Skipping the second stuffing. The hard-feeling chair the customer complains about is almost always one where the second stuffing was skipped. Don't.
- Trying to learn this from a book. This chapter is as good as we can make it, but you cannot learn the stitched edge from a diagram. Find a workshop course, do ten footstools, then come back and the diagrams will start to make sense.
The hardest chapter in the book, by some distance. If you've worked through it, congratulations — you understand the single technique that distinguishes traditional upholstery from everything else. The next chapter is the modern alternative: foam, cut, glued, dropped in. Faster, cheaper, ten years' service rather than a hundred.
A hand-stitched edge is days of skilled work and the heart of what we do. If you'd sooner hand the chair over, send a photo for an estimate. Get a quote on your piece →