What is upholstery webbing?
Upholstery webbing is a woven strip stretched taut across a furniture frame to carry everything built on top of it — springs, stuffing, cushions and the person sitting down. The trade standard for traditional work is 10-strand English jute, 50 mm wide, interlaced over and under like a basket and tensioned with a webbing strainer. Each end takes five 13 mm improved tacks: three through a single layer, the web folded back, then two through the doubled fold. Modern furniture more often uses rubber or elasticated webbing, which stretches by design and gives a softer seat. Get the webbing wrong and the chair sags within a year, however good the work above it.
Webbing is the load-bearing layer of the chair. Everything that follows — springs, stuffing, calico (US: muslin), top fabric — is supported by the woven jute webs at the bottom of the seat. Get the webbing right and the rest of the construction has a sound foundation; get it wrong and the chair will sag within a year, however good the work above it.
Finished your first seat — wonky pleats and all? Put it up on the Reader’s Bench, where readers’ first pieces go on the wall. Send a photo and get featured.
This chapter walks you through every aspect of it: the right material, the layout pattern, how to tack it on, how to tension it, and how to know when you’ve tensioned it correctly.
The right webbing for the job
The trade default for upholstery webbing is English jute, 10-strand, 50 mm wide — either plain yellow-tan or in the black-and-white striped weave. Both are functionally equivalent for most jobs, with the black-and-white slightly heavier and slightly preferred for sprung seats. It’s sold by the metre off rolls; allow about a metre per webbing strip and expect to use 8–12 strips per seat depending on size.
Avoid the cheaper 6- or 8-strand jute sold in DIY shops as “upholstery webbing”. It’s too thin to carry spring loads and stretches sloppily under tension. Avoid elastic webbing for any traditional work — it’s for modern foam-and-staple sofas only. And avoid Pirelli rubber webbing on anything you intend to last: it perishes within a decade.
The general rule is to match the webbing to the construction. Jute for any sprung seat. Jute for any stuffed seat without springs. Elastic only on modern foam-and-zigzag work, where the elastic tension is meant to be part of the suspension system itself.
The 8-strand interlace pattern
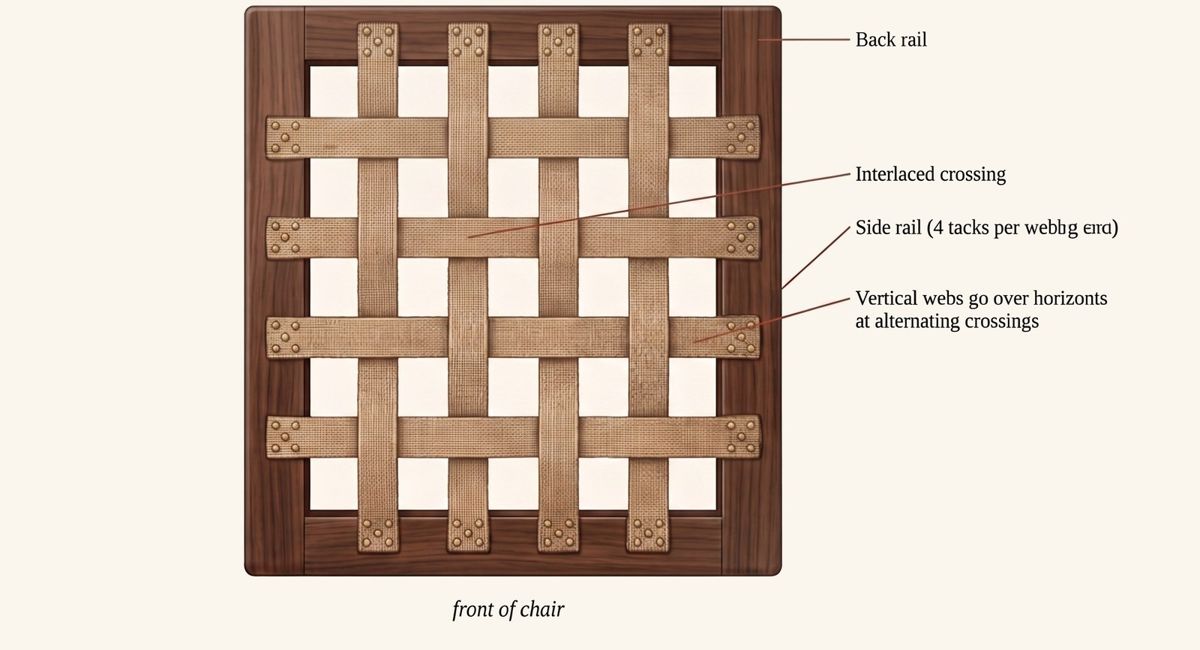
The standard webbing layout for a sprung domestic seat is four horizontal webs and four vertical webs interlaced — eight strands in total, woven over and under each other in a basket pattern. This is the layout you’ll find in any chair that wasn’t short-changed during construction. On a smaller chair — a dining seat, a footstool — you can drop to 3 × 3; on a larger sofa seat you’d go up to 5 × 5 or 5 × 4.
The interlace matters. Webs that simply lie one set on top of the other, without weaving, shift over each other under load and cause the strands to bunch unevenly. Interlaced webs lock together at every crossing and distribute load evenly across the seat. The cost is about ten extra minutes per seat; the benefit is decades of even support.
Tradition has the front-to-back webs go on first, then the side-to-side webs woven through them. Most working upholsterers do it that way without thinking. There’s no structural reason for the order — it’s simply a convention.
How many tacks are needed to secure upholstery webbing?
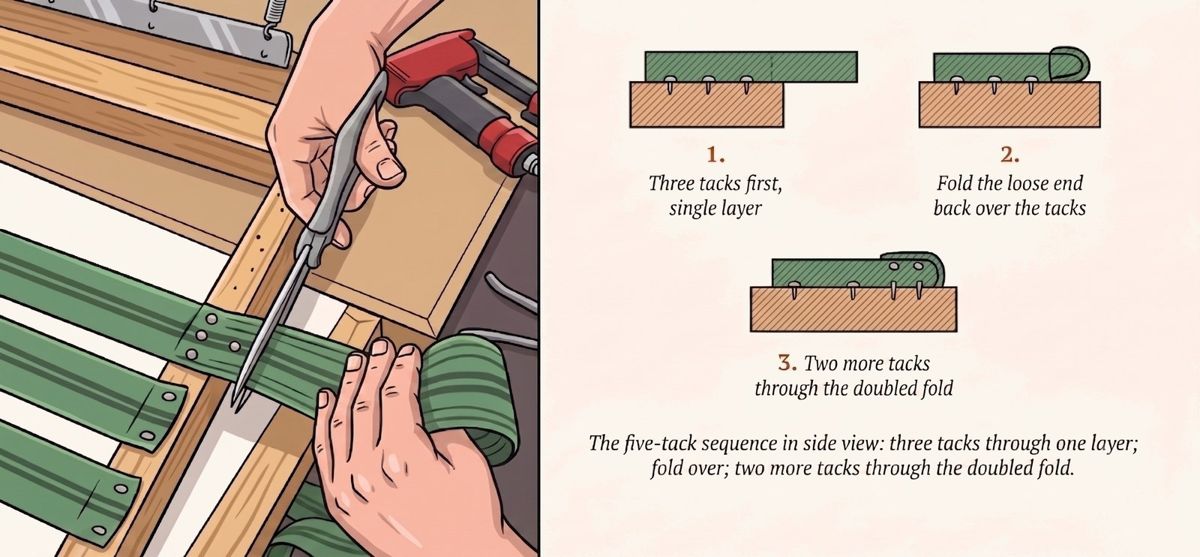
Each end of a jute upholstery webbing strand is secured with five 13 mm improved tacks: three driven through a single layer in a staggered zigzag, the webbing folded back over them, and two more locking the doubled fold — a fixing that will not tear out under strainer tension.
The pattern is consistent across every working upholstery shop and is worth committing to muscle memory.
Three tacks first, driven through one layer of webbing in a slight zigzag, so they don’t all go into the same grain line and split the rail. Then fold the loose end back over those three tacks — this doubles the webbing thickness at the rail edge and stops the webbing tearing under tension. Two more tacks through the fold lock the doubled webbing in place. Five tacks total per end.
Three tacks alone can pull through the webbing under load — jute frays. Five through a doubled section cannot. The doubled fold is the crucial bit, not the exact number of tacks: some old workshops use six or seven. We’ve never seen anyone use four.
Tensioning with a webbing strainer
The trick of webbing is to fix it tightly enough that the springs above can compress without the webbing slackening under load, but not so tightly that the jute fibres are pre-stressed close to their tear point. The right tension is roughly 10% stretch — the webbing should be drum-tight enough to ring like a slack drum head when you tap it with a finger, not slap limply, but not be rigid like a guitar string either.
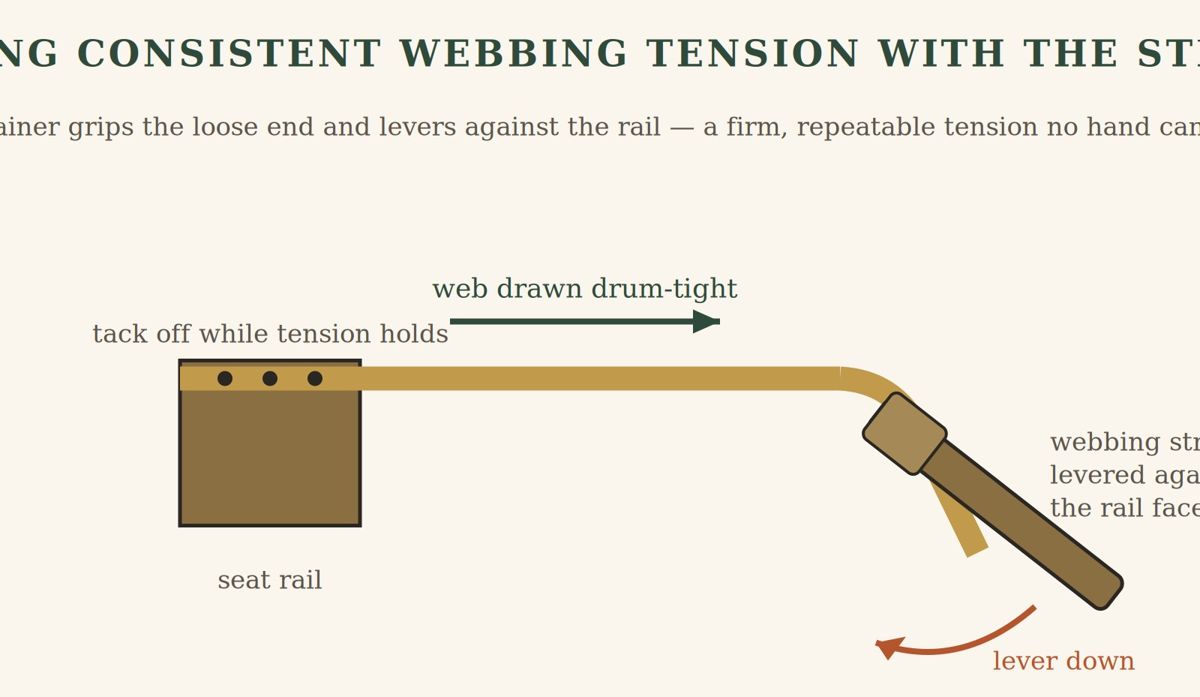
Achieving consistent 10% stretch by hand is impossible; this is what the webbing strainer is for (shown at the top of this chapter). The bat-shaped wooden tool has a slot that the loose end of the webbing passes through. You tack one end first with the full five-tack pattern, then brace the strainer against the outside of the rail you’re working on, lever the handle down so the webbing tightens to a predictable tension, fix the strained end under tension with three tacks, release the strainer, and fold and lock with the final two. A correctly strained web should sound like a low drum when tapped and barely deflect under a firm thumb.
10% stretch means a 100 cm strand fitted at rest is stretched to about 110 cm under tension before the second end is tacked. Once tacked, it relaxes back to roughly 104–106 cm because the tacks slip a fraction. That remaining 4–6% stretch is the working range that keeps the seat firm.
The first thing we do with a beginner the day they learn webbing is have them work three full seats: a drop-in, a dining seat, and a sprung wing-back. By the third we ask them to tension the webbing to where they think it’s right, then we tap it with a finger. Their first attempt is always too loose; the second too tight; by the third they hit it. The drum-tap test is what we calibrate them on — a slack drum head, not a guitar string. Once you’ve heard the right pitch a hundred times, your hands know how hard to lever the strainer without thinking. There is no shortcut to that calibration: you do the work, and the work teaches you.
A common beginner question: why is webbing tacked to the underside of the seat rails, not the top? The answer is structural. Webbing on the underside puts the timber of the rail in compression when the seat is loaded, with the webbing in tension below — and compression is the loading wood handles best. Webbing on the topside, which factory zigzag-spring construction sometimes uses, puts the rail in tension on its outside fibres, the loading wood handles worst. It’s the same reason a beam over a doorway has its grain running horizontally, not vertically. The traditional underside fixing is one of the small structural choices that makes a properly-built chair last a century.
Webbing for unsprung work
Unsprung seats — drop-in dining seats, drop-in stools, simple stuffed pads — use the same 8-strand interlace and five-tack pattern, but the tension can be slightly higher because the webbing isn’t sharing load with springs above it. Aim for 12–15% stretch rather than 10%: a drum-tighter sound, closer to a guitar string than a drum head.
On smaller seats, the full 8-strand layout is overkill. For a dining-chair drop-in, 3 × 3 is plenty; on a stool top you might get away with 2 × 3, or even webs running in one direction only, as long as the stuffing above is firm enough to redistribute the load. Match the layout density to the seat size; don’t apply the same pattern to every job.
A drop-in seat is the upholstered pad that lifts out of a dining-chair frame. We teach beginners drop-in seats first, because they’re the cheapest possible thing to get wrong — and the fastest way to learn the five-tack pattern by repetition.
Over-tensioning. Guitar-string-tight webbing snaps under spring load. The drum-head sound is what you’re after, not the high-pitched ring of taut wire.
Skipping the fold-over. Three tacks straight through one layer of jute is asking for the webbing to tear out at the first heavy sit. The fold-over and the extra two tacks are not optional.
Tacking through the same grain line. Five tacks in a perfect row split the rail — that’s exactly what the zigzag prevents. Keep them off-axis even on rails where the timber feels rock-solid.
Crossing strands flat instead of weaving. The interlace is doing real structural work. Skip it and the webs shift over each other in service.
Using the wrong webbing. 6- or 8-strand jute, elastic webbing, anything “easy to fit” — all the wrong material for traditional work. 10-strand jute, every time.
Tools & materials for this job
- English jute webbing, 10-strand, 50 mm (paid link)
- 13 mm upholstery tacks (paid link)
- Webbing strainer (stretcher) (paid link)
- Magnetic upholstery hammer (paid link)
Rather hand this one to a professional? Find a good upholsterer near you →