How does traditional springing work?
Traditional springing uses double-cone coil springs stood on the webbing, stitched down to it in three places with a spring needle and twine, then lashed to each other and to the frame with laid cord. The lashing is the part that matters: it holds each spring upright and slightly compressed so the seat works as one surface rather than a field of independent springs. Springs are sized by gauge and height — a dining chair might take 10 or 12 gauge at 100 mm, an armchair seat 9 gauge at 150 mm. Done properly a sprung seat lasts decades and can be reworked rather than replaced.
This chapter walks you through the work that no other modern technique replaces: hand-tied coil-spring construction.
Customer undecided on cloth? The free fabric visualiser shows their own chair re-covered in any fabric from two photos.
We've reached the moment when Pratt's 1822 patent enters the workshop. Done well, hand-tied springing produces a seat that is comfortable in year one and still comfortable in year sixty. Done badly, it sags in two years and you can hear the springs creak from the next room. Of all the techniques in Part Two, this is the one that most rewards care and patience.
Traditional springing has four stages, all covered here: selecting and placing the right springs in the right pattern; bridling them to the webbing so they stand upright and don't shift; lashing their tops together with the eight-knot pattern that gives the seat its load distribution; and setting the height — the “spring-up” — that determines how the seat will feel. Each stage is straightforward in itself. The skill is in doing all four with consistent attention; the seat will remember any shortcut you take.
Modern factory chairs use clipped-on zigzag springs (Chapter 11) because they're faster to install. Hand-tied coils feel different in service: more responsive, longer-lived, and adjustable to a particular sitter. They also take a working day per seat — so the choice is as much economic as technical.
How many springs does a chair seat need?
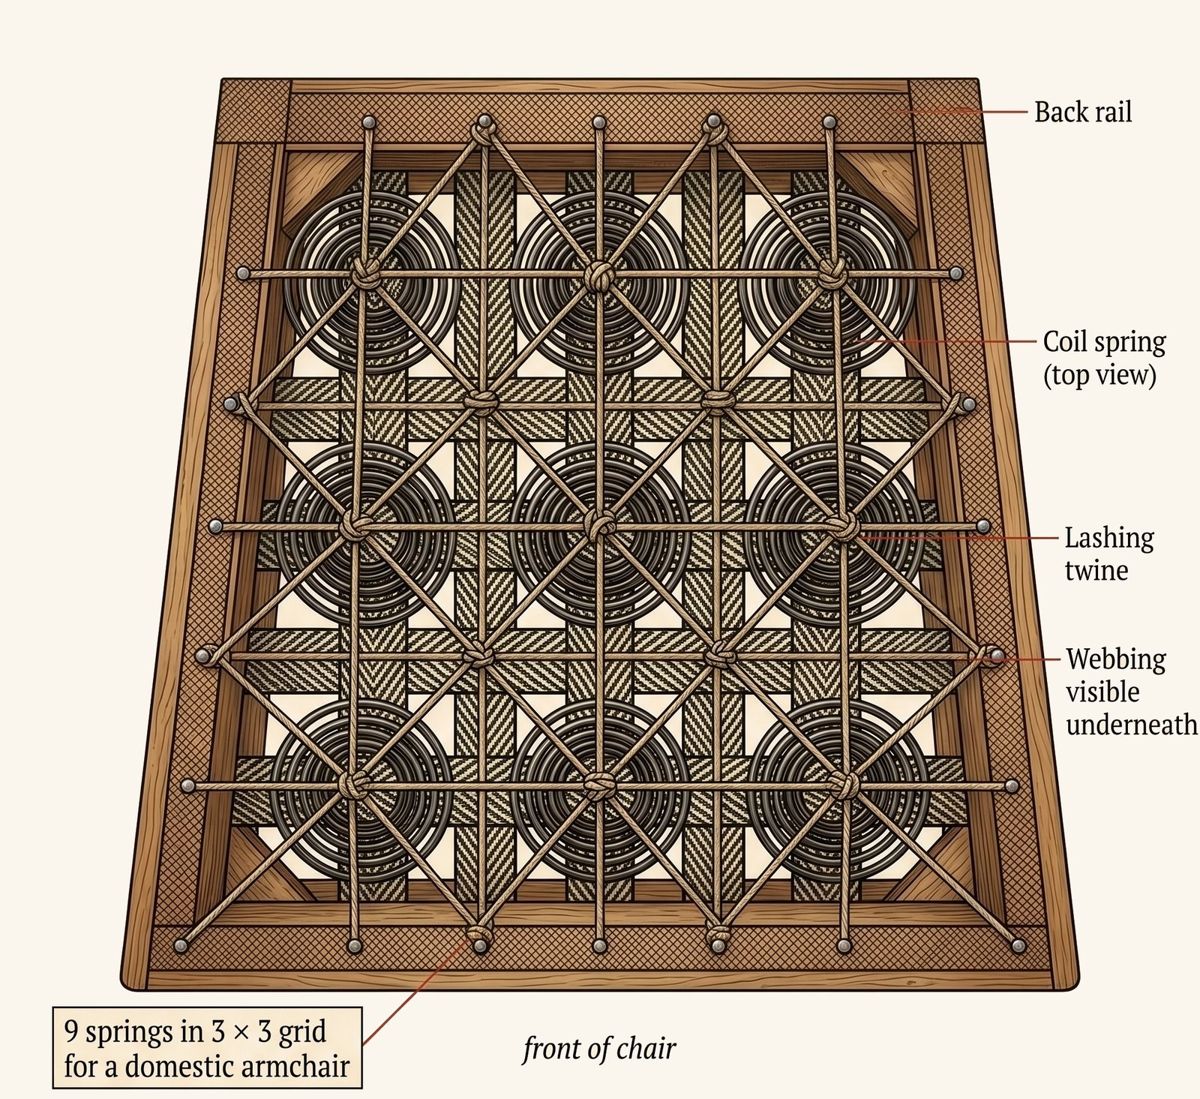
A domestic armchair seat takes nine coil springs — 8.5 inch, 9-gauge — set in a 3 × 3 grid, roughly one spring per 18 cm of seat, lashed down to a working height of about 7 inches. Backs use lighter 10-gauge springs.
Coil springs for upholstery (paid link) are sold by height (in inches) and wire gauge — a number, where lower means thicker wire. Domestic seat springs are typically 8.5 inches tall and 9-gauge. Heavier 8-gauge springs go in deep sofa seats; lighter 10-gauge ones in chair backs and edge work. The single biggest beginner mistake is to use the same gauge throughout the chair — the seat needs more spring than the back.
Standard layout: a domestic armchair seat takes nine springs in a 3 × 3 grid. A small chair (a slipper, a tub) takes six in 2 × 3; a two-seater sofa seat twelve (3 × 4); a three-seater fifteen (3 × 5). The rule is roughly one spring per 18 cm × 18 cm of seat area — closer and the springs interfere with each other, further apart and the load isn't distributed well.
Trade suppliers will sell you mixed-gauge sets — 9-gauge for the seat, 10-gauge for the back — in matched sizes if you ask. For one-off jobs, buy in 50s: the price per spring on a 50-pack is roughly half that of buying singly.
Bridling the springs to the webbing
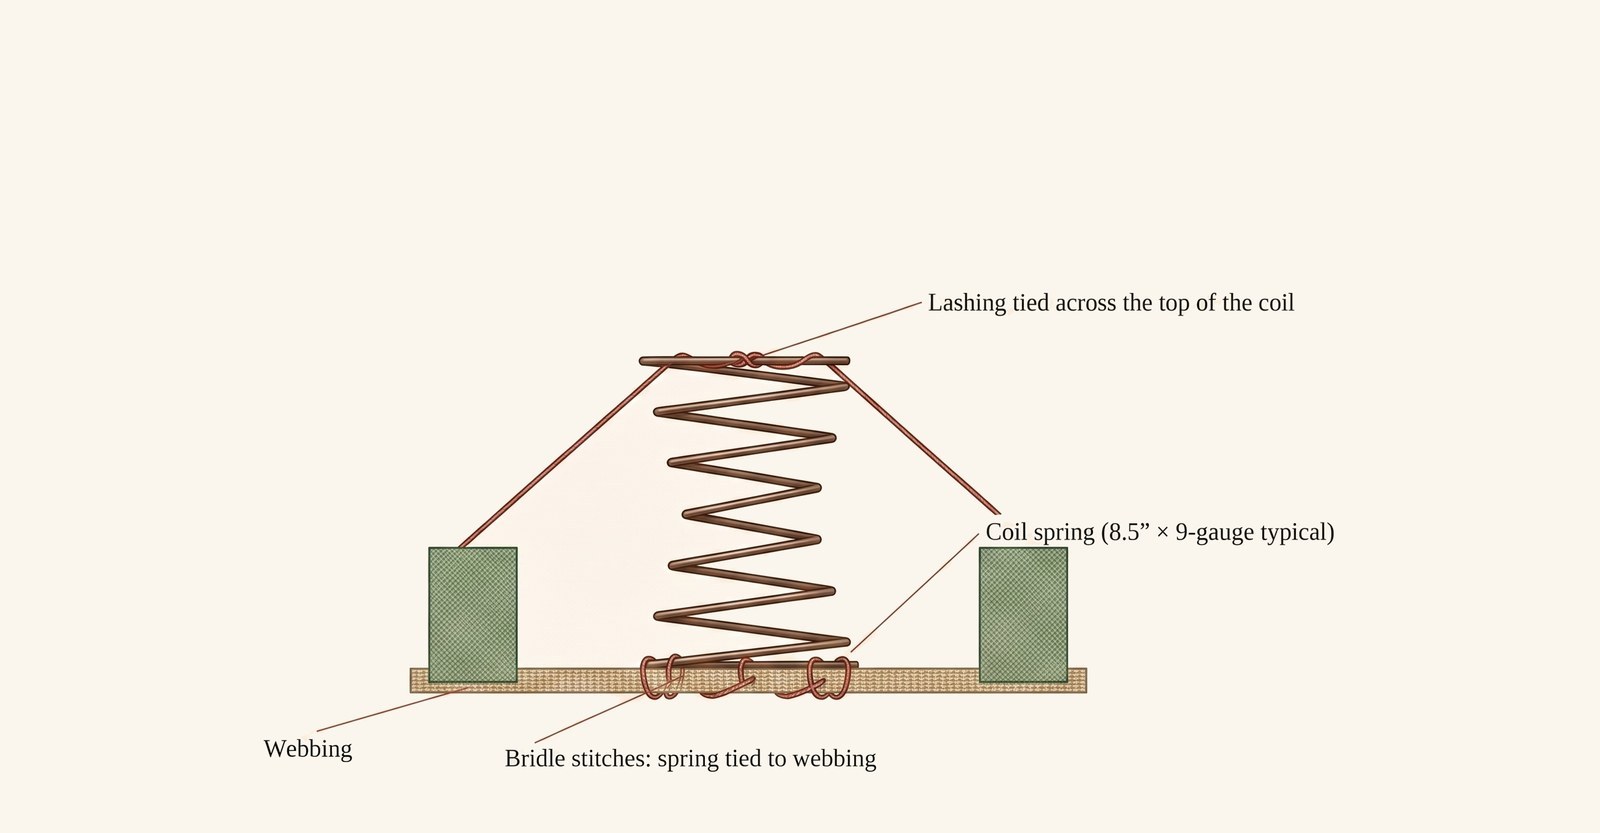
Once the springs are in their grid, they're fixed to the webbing so they stand upright and don't shift in service — with bridle stitches: small loops of mattress twine that pass through the webbing, around the bottom coil of the spring, and back through, knotted off underneath.
Three bridle stitches per spring — one at the front, two at the back — forming a triangular grip on the bottom coil. Use a small curved needle (paid link) and standard waxed mattress twine (paid link). Each spring takes about thirty seconds once you have the rhythm; allow ten minutes for a nine-spring seat. The springs should be slightly compressed by the bridling — held firmly enough they won't fall over when you lift the chair, not so firmly they're pre-loaded before the seat takes any weight.
We bridle from the top side of the webbing, working down through it and tying off underneath. Some old workshops go from below upwards; the result is the same. The point is the knot stays out of the way of the spring's working coil.
The eight-knot lashing pattern
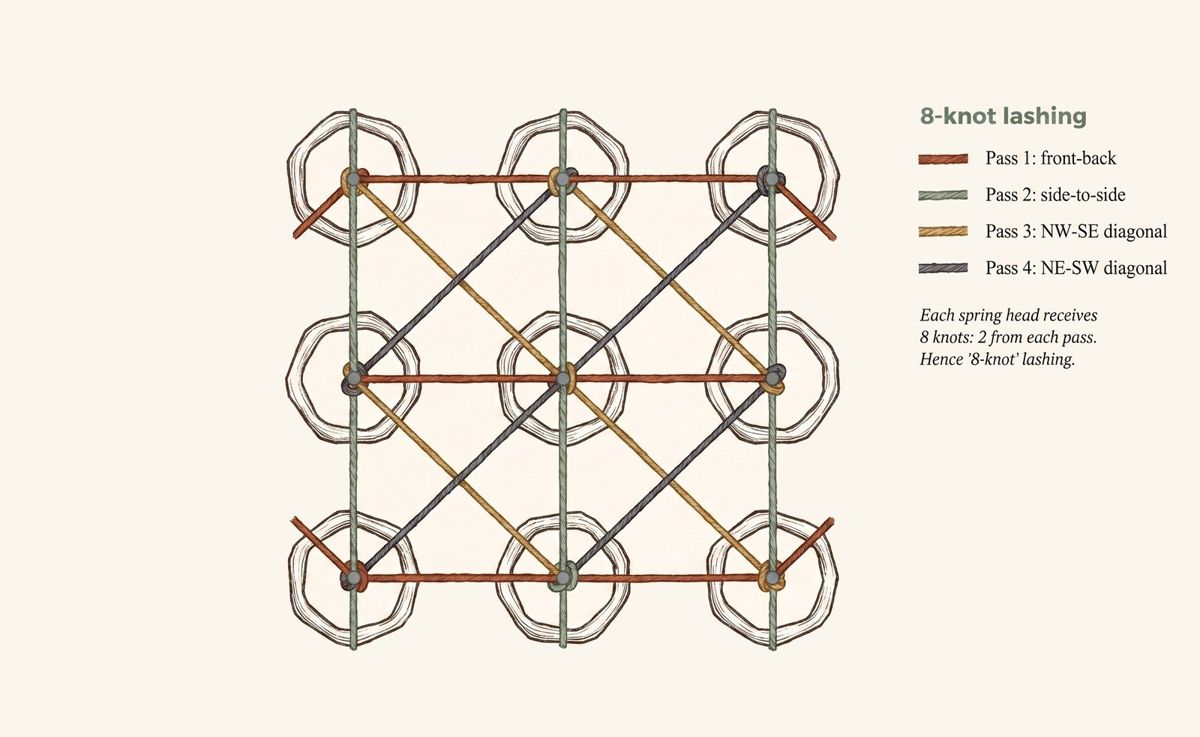
The defining technique of traditional springing is the eight-knot lashing — the four-pass pattern of laid hemp cord (paid link) that ties the heads of all the springs together so they share the load and stay at a consistent height. Each spring head receives eight knots: two from each of four passes — front-to-back, side-to-side, and the two diagonals.
The knots are clove-hitches, tied around the top coil of each spring. The cord is laid tight — tight enough that the springs are slightly compressed, putting them under permanent pre-load so they push back the moment any sitter touches the seat. That pre-load is what makes a hand-tied seat feel responsive even when no-one is sitting on it. The cord is anchored at each rail with a 16 mm tack or staple, wrapped twice around the tack head before driving it home so it doesn't cut into the timber.
Use proper laid hemp cord, not synthetic twine. The hemp's natural roughness grips the spring heads and stops the knots slipping; synthetic cord is too smooth — the knots loosen and the seat drops over time. We covered this in Chapter 5; it's worth repeating here.
Setting the spring-up height
The lashing controls the springs' working height — the “spring-up”. Pulled tight, the springs are compressed by perhaps 20% of their unloaded height; left loose, they stand at full extension and the seat feels soft and bouncy. The right tension depends on the chair, the customer's weight, and the kind of seat you're building.
For a domestic armchair seat: 8.5″ springs lashed to a working height of about 7″ — so 1.5″ of compression. The seat feels firm and supportive; the first stuffing on top adds the comfort. For a deep sofa seat: 9″ or 10″ springs lashed to about 7.5″, for more travel under load and a softer feel. For a chair back: lighter 10-gauge springs lashed less tightly — the back doesn't carry the seat's compression load, and over-tensioning just makes it feel hard.
Set the lashing tension on the centre row of springs first; check the height with a ruler; then lash the outer rows to match. It's far easier to lash the perimeter to fit the centre than to lash the centre to fit the perimeter.
Tools & materials for this job
- Upholstery coil springs (8.5″, 9-gauge) (paid link)
- Waxed mattress twine (paid link)
- Laid hemp lashing cord (paid link)
- Curved upholstery needles (paid link)
- 16 mm upholstery tacks (paid link)
- Magnetic upholstery hammer (paid link)
The eight-knot pattern is hard to describe in the abstract and obvious once it's in front of you. We give every apprentice the same exercise on day one of springing: tie a nine-spring set in laid cord, then count the knots on each of the nine heads. Each should have exactly eight — not all piled on top, but stepped slightly down the outside of the coil so they don't bunch at one point.
First attempts nearly always come out with ten or twelve knots on the corner springs (double-anchored at the rails) and six or seven in the centre (a knot skipped while crossing). The counting reveals the pattern. By the third attempt, every spring has eight.
The eight-knot pattern always pairs perpendicular passes — front-to-back with side-to-side, and the two diagonals together — rather than running all four the same way. The reason is structural: paired perpendicular passes hold the springs against being twisted by uneven loads in a way no other pattern does.
Sit hard in one corner of an unevenly-lashed seat and the springs there try to lean in toward the centre; the perpendicular pairs prevent that lean. It's the same principle as cross-bracing a timber frame — forces in one direction balance forces in the other, and the structure keeps its shape under load.
- Wrong gauge throughout. 9-gauge in the back makes the back feel hard; 10-gauge in the seat makes the seat sag. Mixed-gauge sets exist for a reason.
- Skipping the bridling. Bridle stitches stop the springs walking. Skip them and within a year the springs have shifted out of position. Ten minutes per chair saves the customer a callback.
- Synthetic twine for lashing. The knots slip and the seat drops. Hemp laid cord every time.
- Over-lashing. Springs lashed too tight have no travel and the seat feels like a board. Compression should be roughly 20%, not 50%.
- Not counting the knots. Eight per spring is the standard; six is too few, ten is double-anchored. Count the first chair you ever do on your own — it calibrates you.
Springs lashed, eight knots per head, the working height set — the seat's foundation is done. The next chapter takes the same load-bearing job and shows you the modern factory equivalent: zigzag springs, clipped on in fifteen minutes, with some thoughts on when each is the right answer.
Rather hand this one to a professional? Find a good upholsterer near you →